Home audio
  Audio components
  Crossover components
  Test & measurement
  DIY kits
  Accessories
  New products
  Speakers
 Amplifiers
 DAC converters
 DSP modules
 Turntables
 Streamers
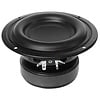 Woofers
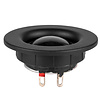 Tweeters
 Exciters
 Bass shakers
 Plate amplifiers
 Amplifier modules
 Single board computers
 Assembled crossovers
 Printed Circuit Boards (PCB)
 Capacitors
 Resistors
 Coils
Coils Circuit Breakers
 Crossover tools
 Screw terminals
 Acoustic measurements
 Electric measurements
 Sound level meters
 DIY amplifier kits
 DIY component packs
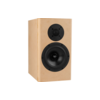 DIY speaker kit
 DIY subwoofer kits
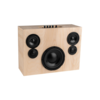 DIY bluetooth speaker
 DIY electronics kits
 Binding posts
 Cabinet Hardware
 Cables
 Connectors
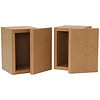 Speaker cabinets
 Electromechanics
 Power supplies
 Speaker repair
 Workshop & tools
 Amplifier accessories
 Stands & mounts
 Gift voucher
 Books
Books New products


 Speakers
 Amplifiers
 DAC converters
 DSP modules
 Turntables
 Streamers
 Woofers
 Tweeters
 Exciters
 Bass shakers
 Plate amplifiers
 Amplifier modules
 Single board computers
 Assembled crossovers
 Printed Circuit Boards (PCB)
 Capacitors
 Resistors
 Coils
Coils Circuit Breakers
 Crossover tools
 Screw terminals
 Acoustic measurements
 Electric measurements
 Sound level meters
 DIY amplifier kits
 DIY component packs
 DIY speaker kit
 DIY subwoofer kits
 DIY bluetooth speaker
 DIY electronics kits
 Binding posts
 Cabinet Hardware
 Cables
 Connectors
 Speaker cabinets
 Electromechanics
 Power supplies
 Speaker repair
 Workshop & tools
 Amplifier accessories
 Stands & mounts
 Gift voucher
 Books
Books New products
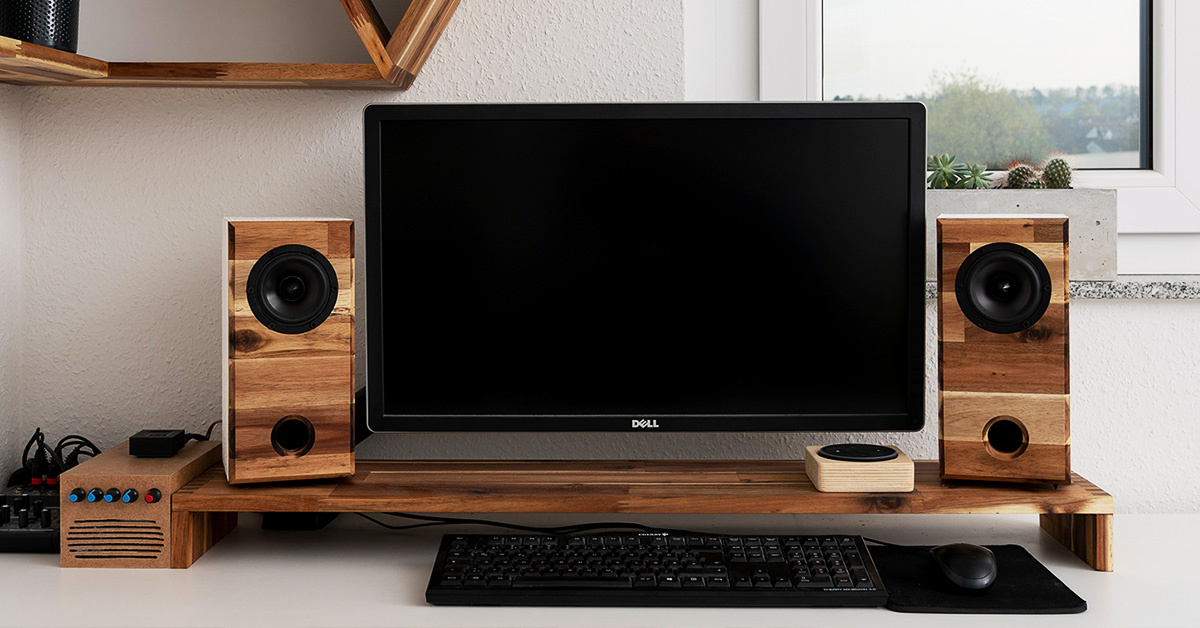
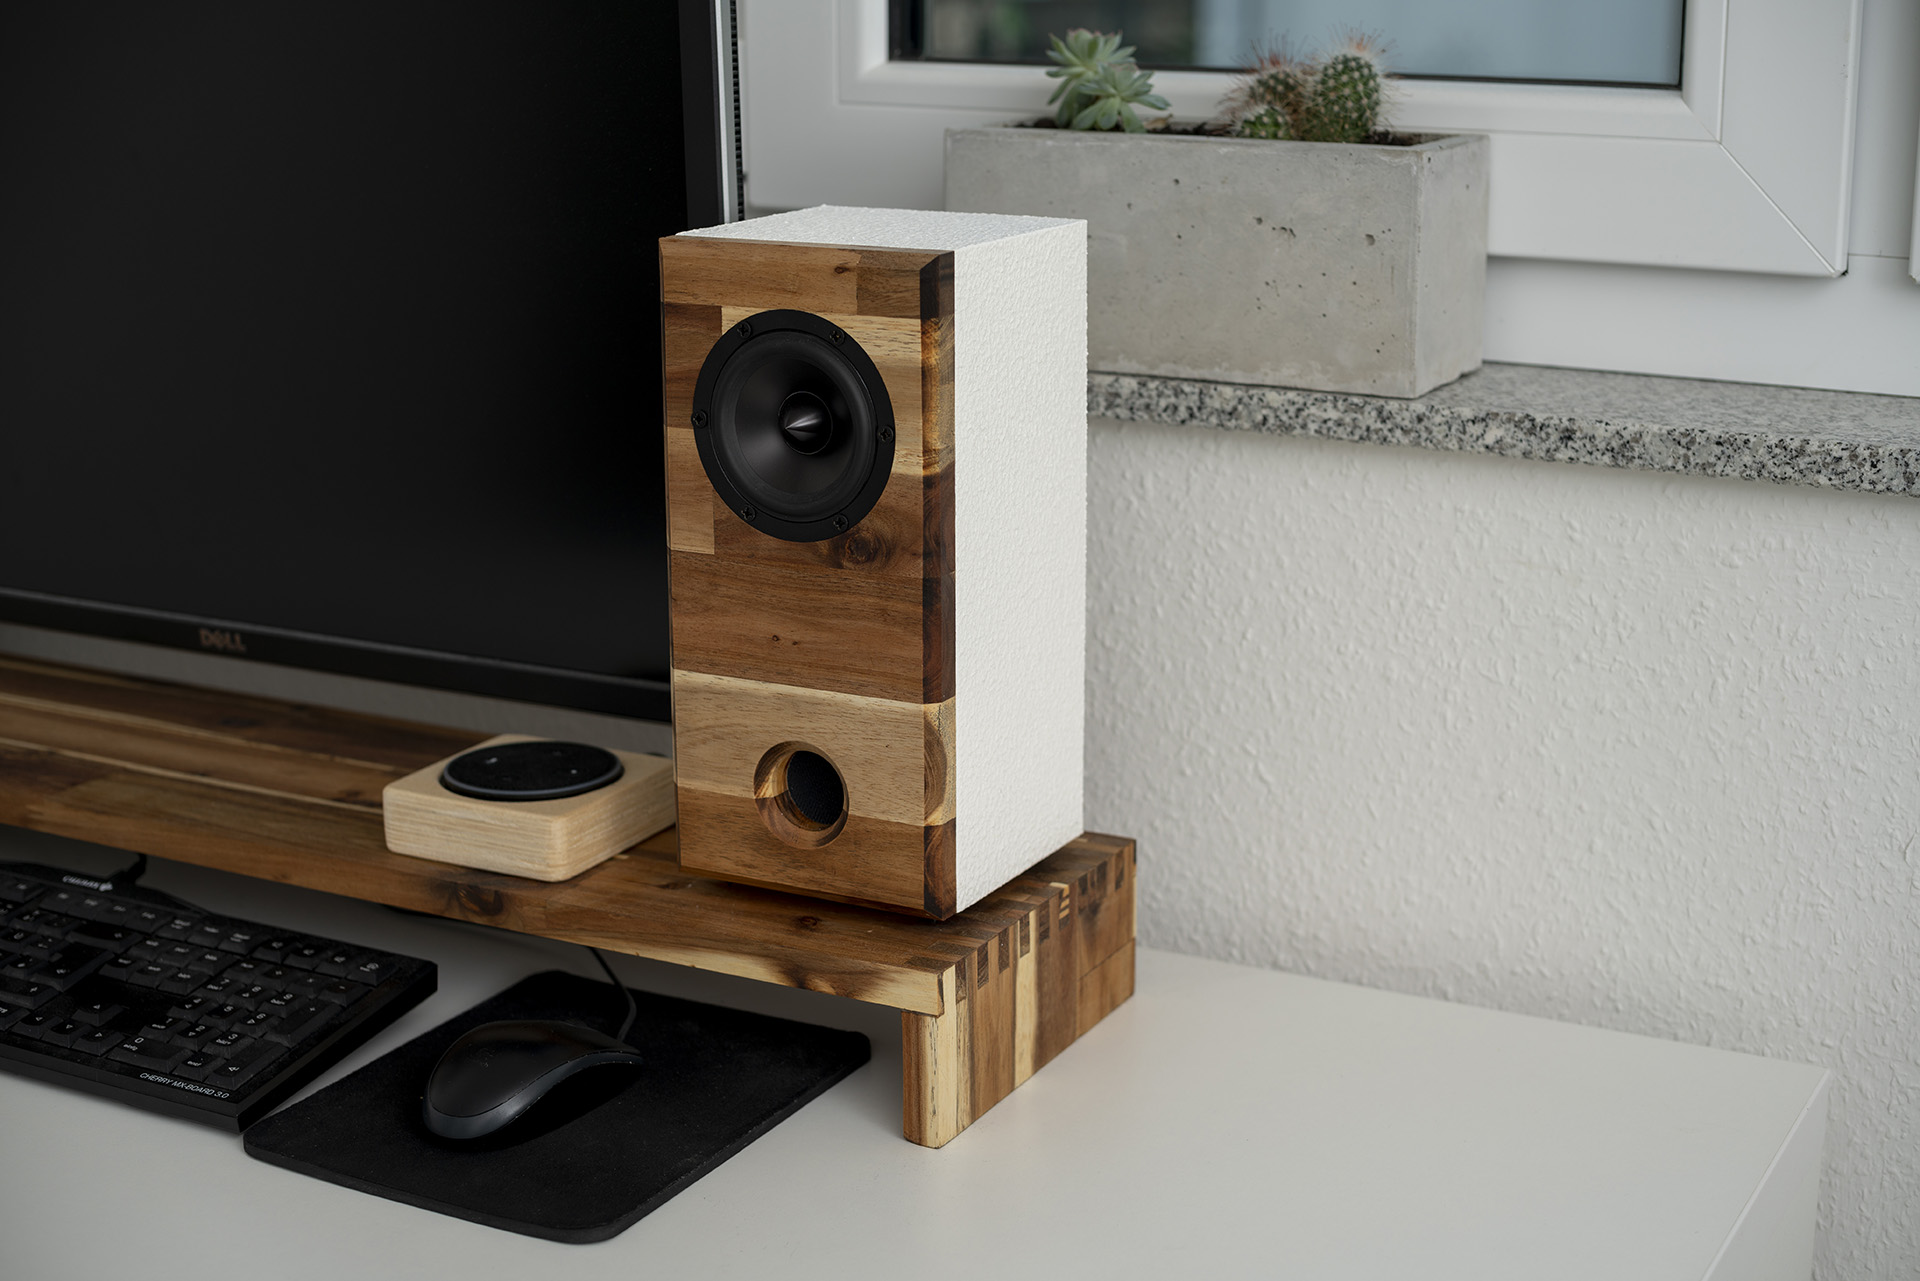
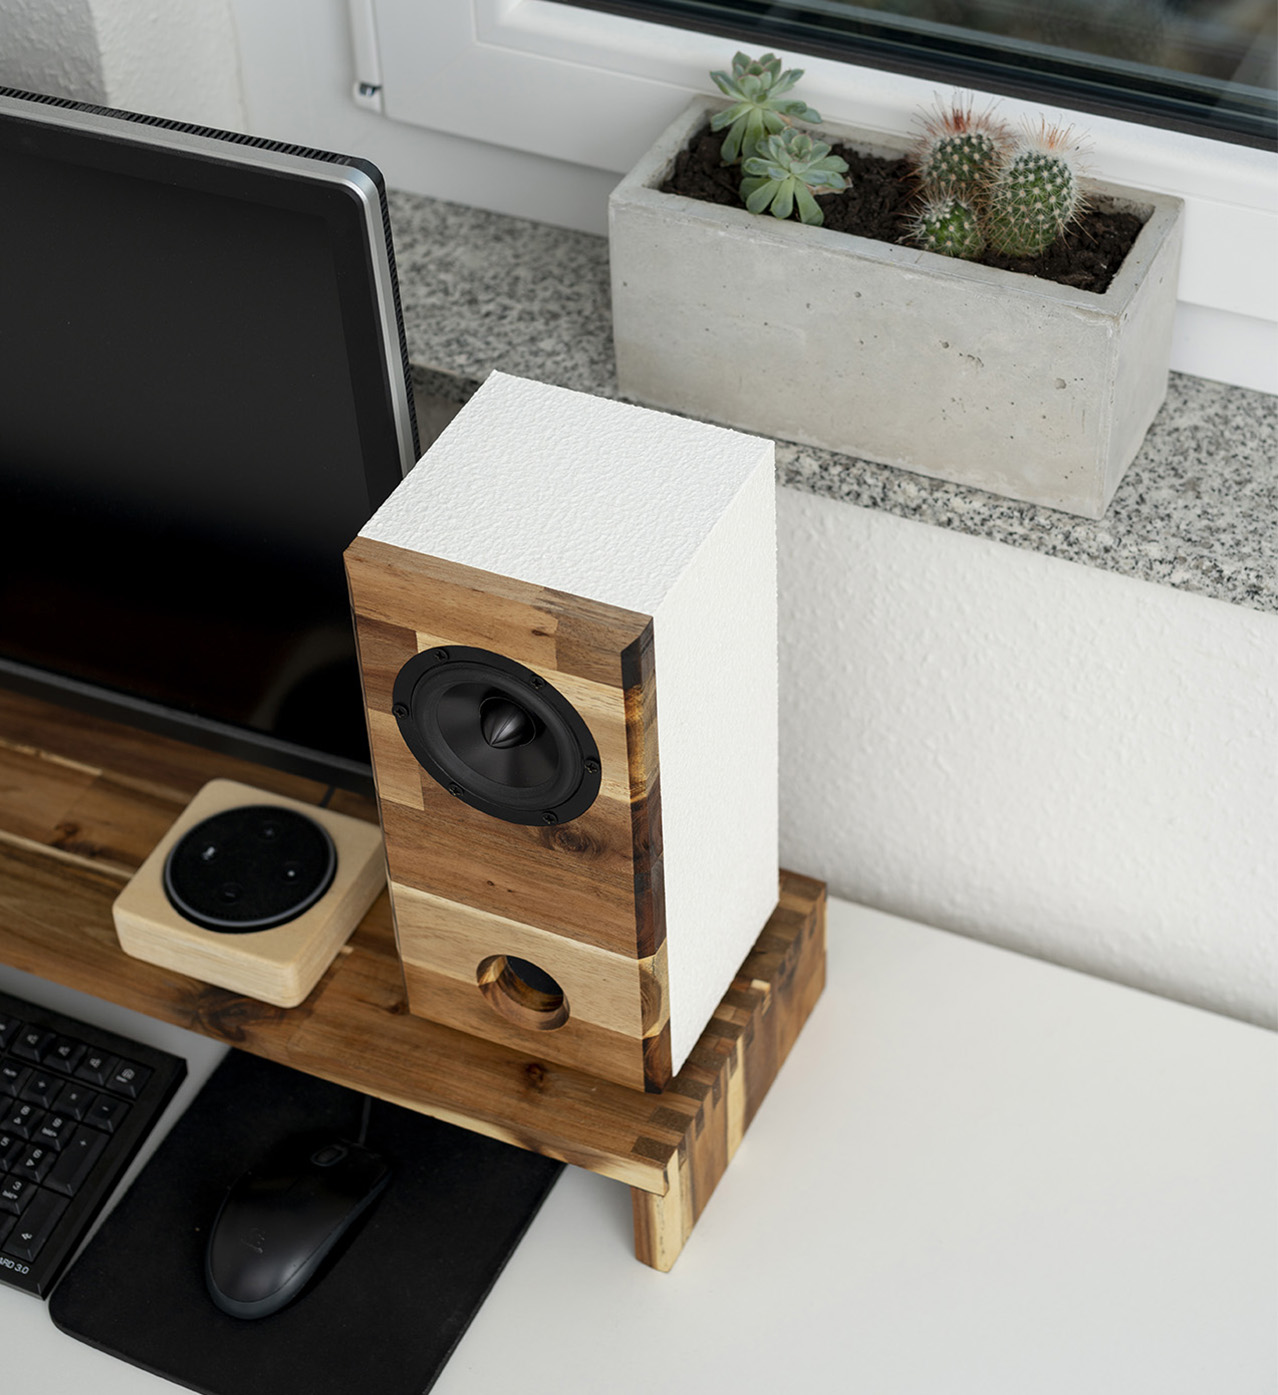
4″ Mini Tower Speakers
Last year in November, I built myself an 8 inch subwoofer for my apartment and this was the first time I experienced the great sound quality of a high-quality speaker driver in conjunction with a well-designed enclosure.
Then, only a few weeks ago, my brother built himself a pair of speakers for his desk. I visited him to listen to his new speakers and they sounded absolutely amazing. This was the moment I decided that I wanted to replace my current pair of 3.5″ concrete desktop speakers that I had placed right next to my monitor with a new set of speakers.
The Design
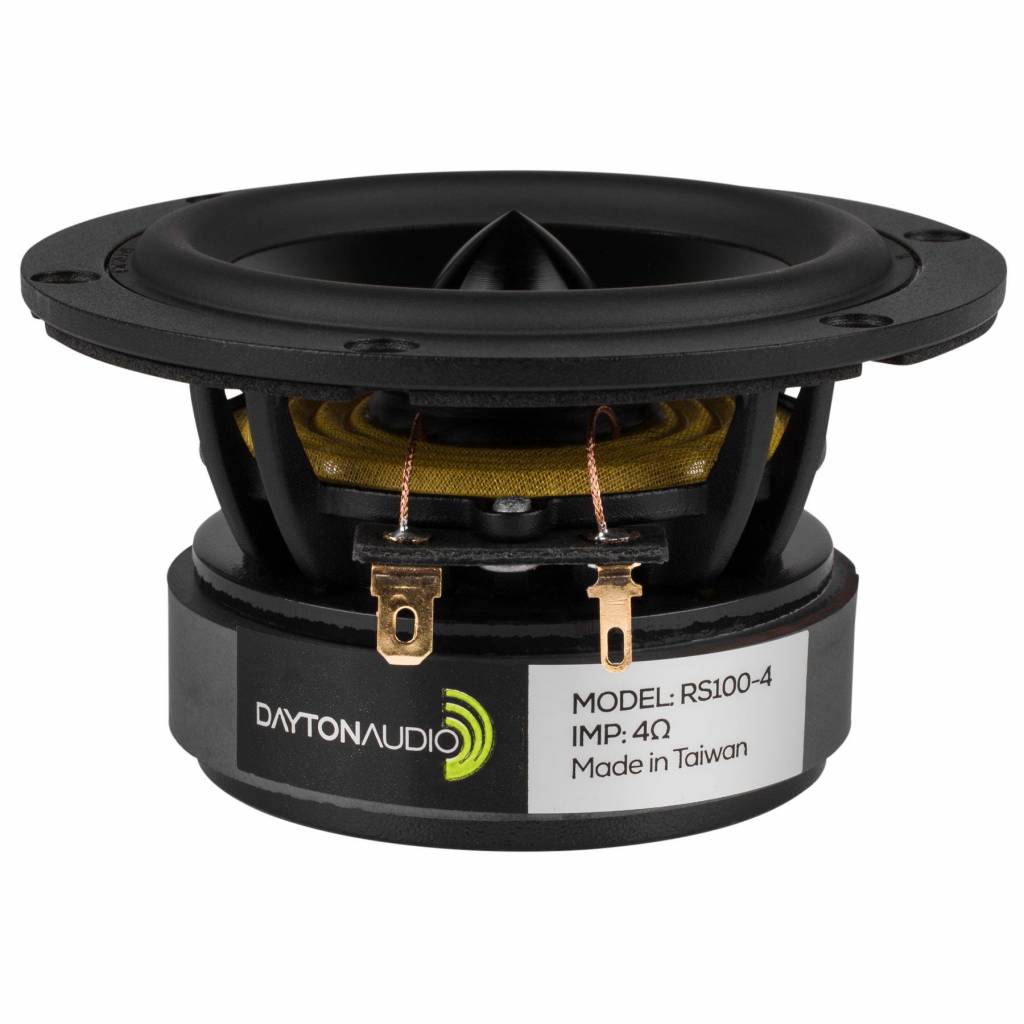
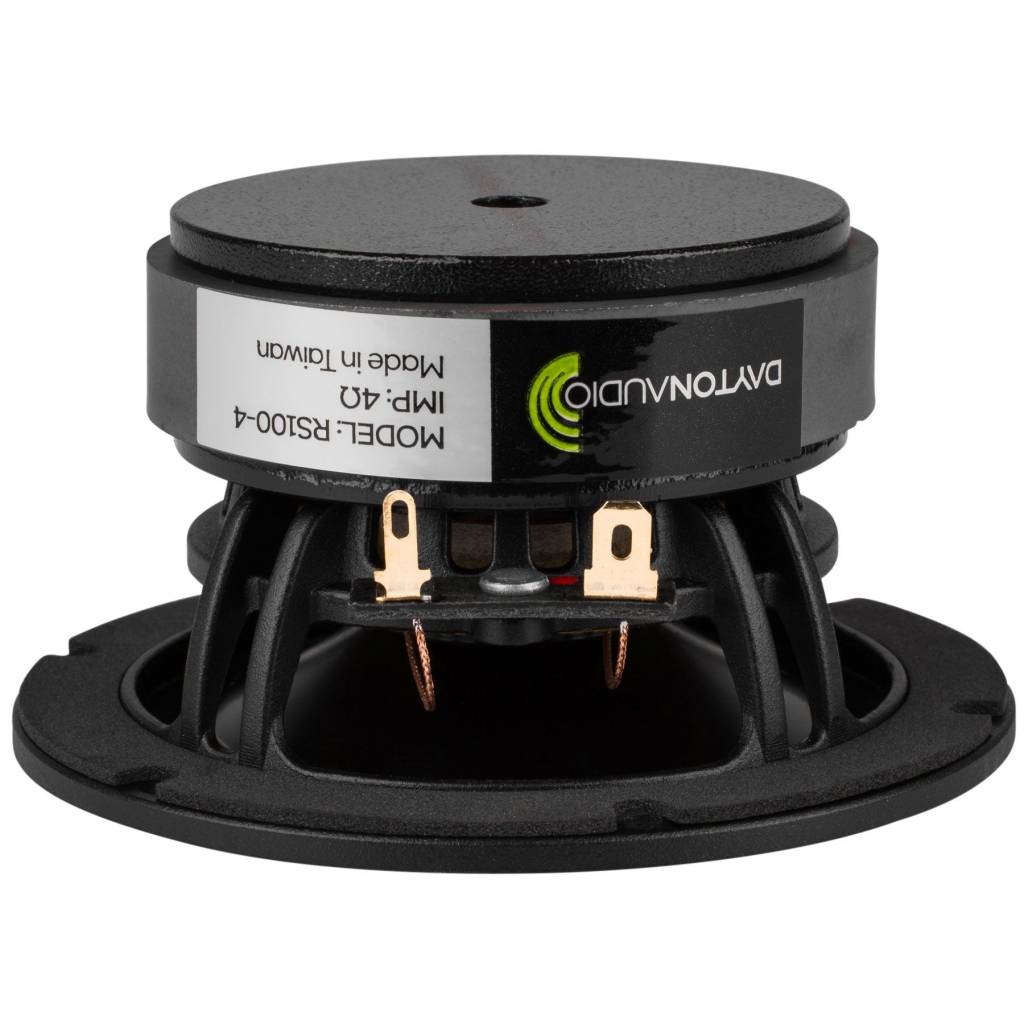
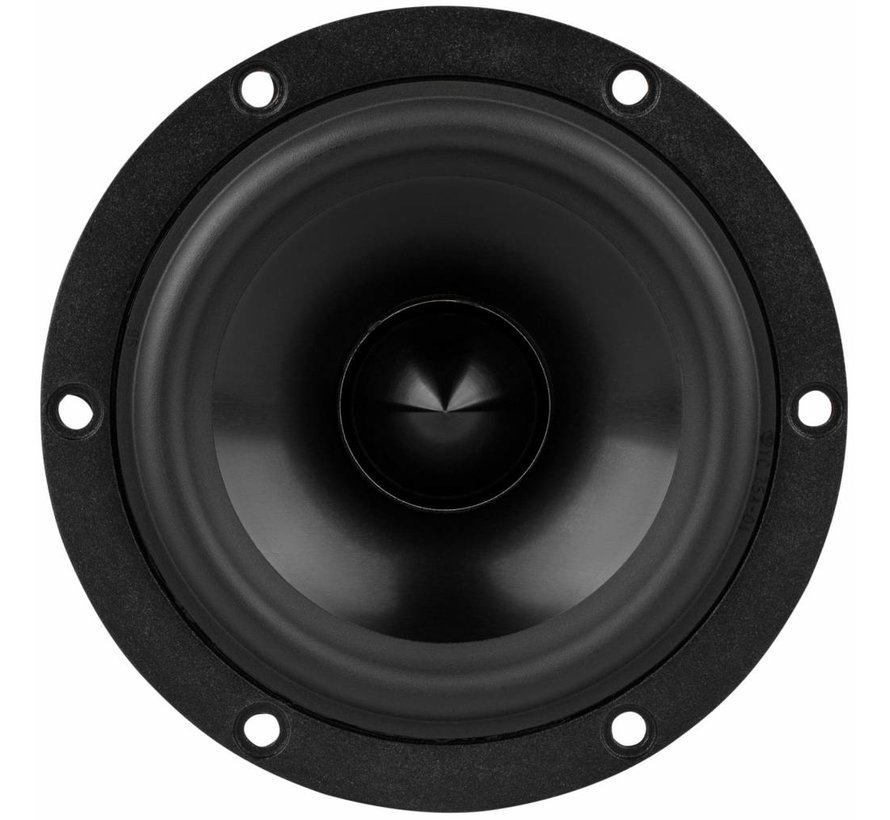
Since I wanted to ensure an upgrade in sound quality, I decided to go with 4″ Dayton Audio RS100-4 full-range drivers. These drivers seemed to be very well suited for my requirements while staying within my size limitations. The drivers have an impedance of 4 Ohms, are capable of taking up to 30W RMS power and with their 80-20kHz usable frequency range, they are able to reproduce any frequency from the highest highs to the upper bass frequencies.
To give the speaker some additional punch in the lower frequencies, I decided to build a ported enclosure just like I did with my subwoofer.
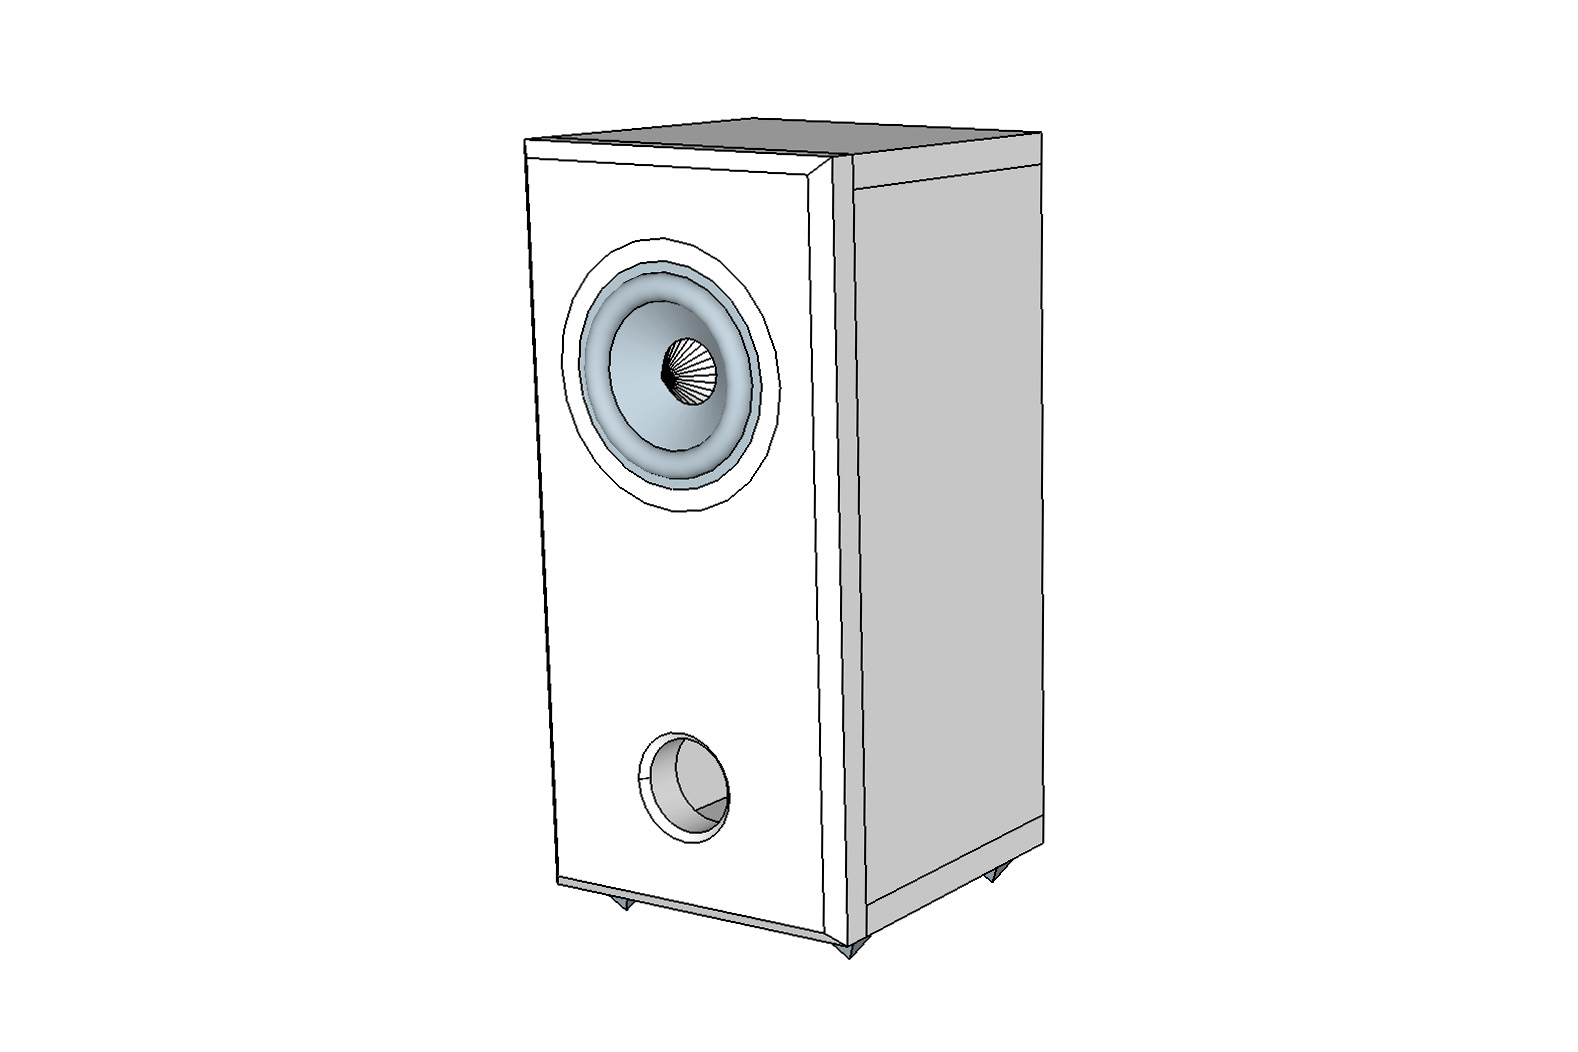
After some extensive calculations using the free app Speaker Box Lite, this is the rough design I came up with. The enclosure’s outer dimensions ended up being 136x144mm in width and depth and roughly 285mm in height, giving me an effective inner volume of 2.8 litres after subtracting the port and magnet volume.
Regarding the port, I decided to use some DN40 PVC pipe which can be bought at pretty much any hardware store. It was simply the easiest and cheapest solution I could come up with. Having an inner diameter of 36mm and an overall length of 250mm, it tunes the enclosure to roughly 64Hz.
The Build
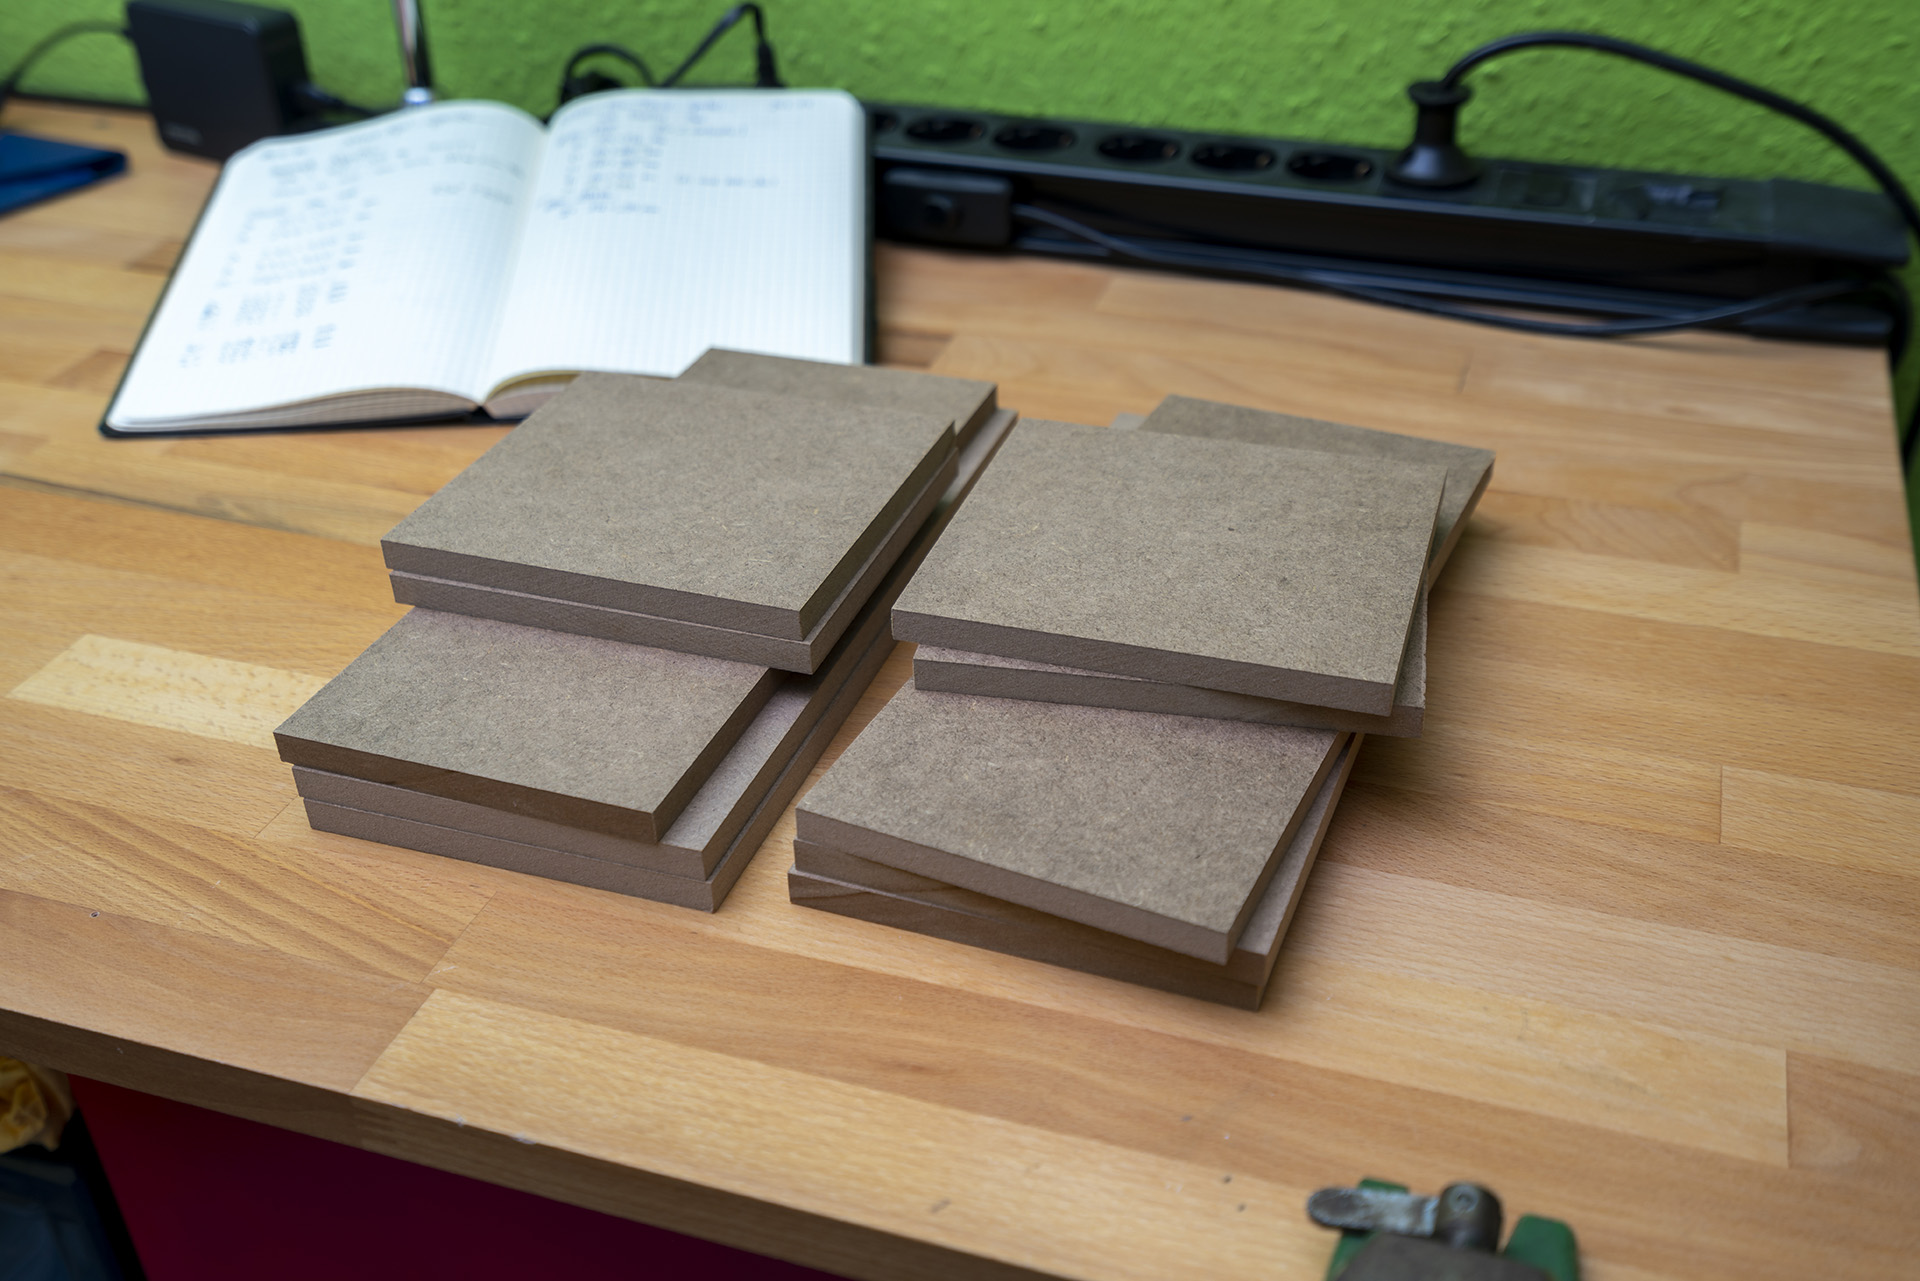
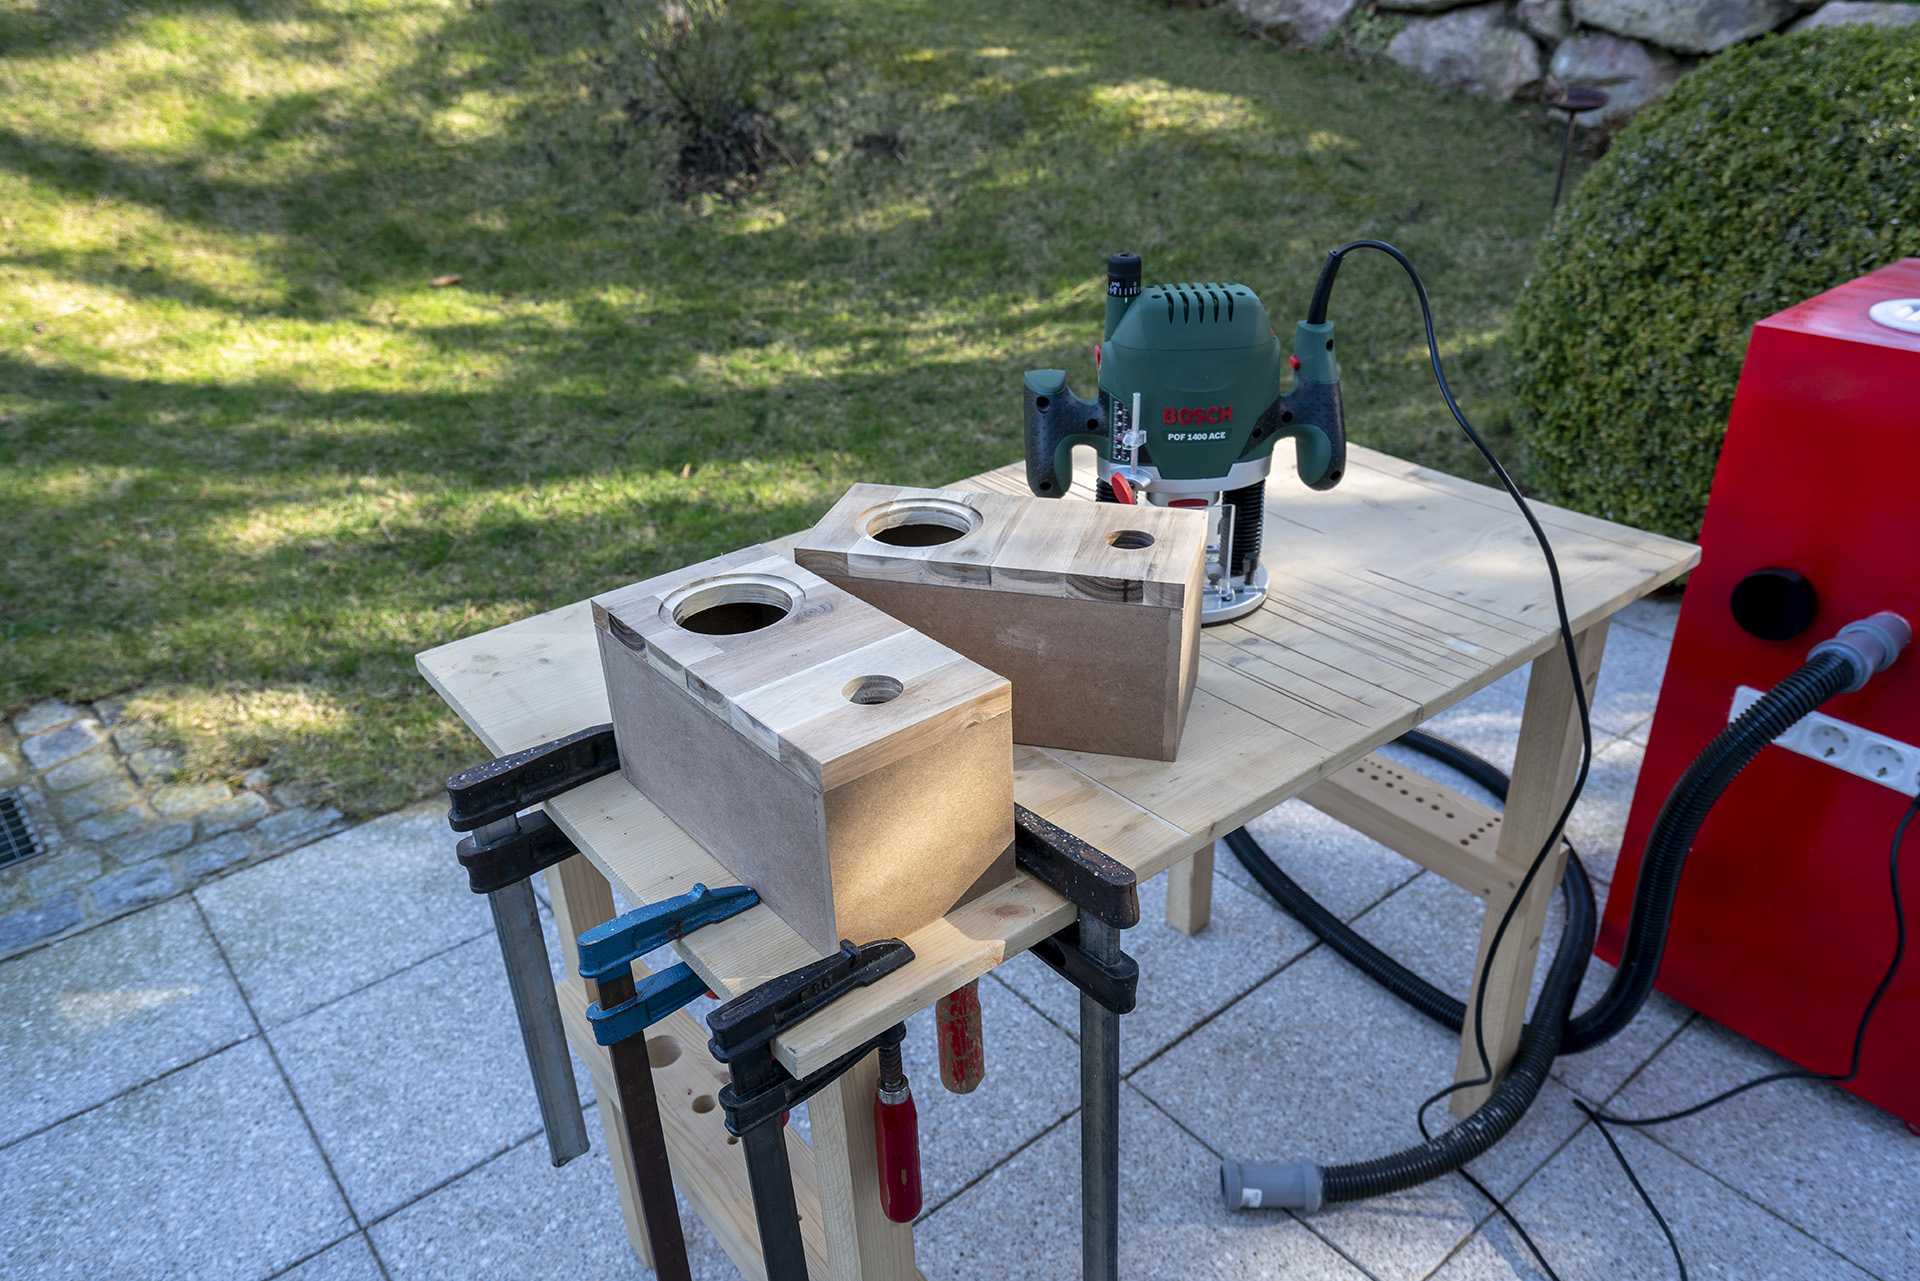
As usual, this project also started out with a trip to the local hardware store. To save some time, I decided to let them cut the ten required pieces of 10mm MDF to size right away, even though that meant that I had to sacrifice some accuracy in the dimensions which seemed acceptable in this case.
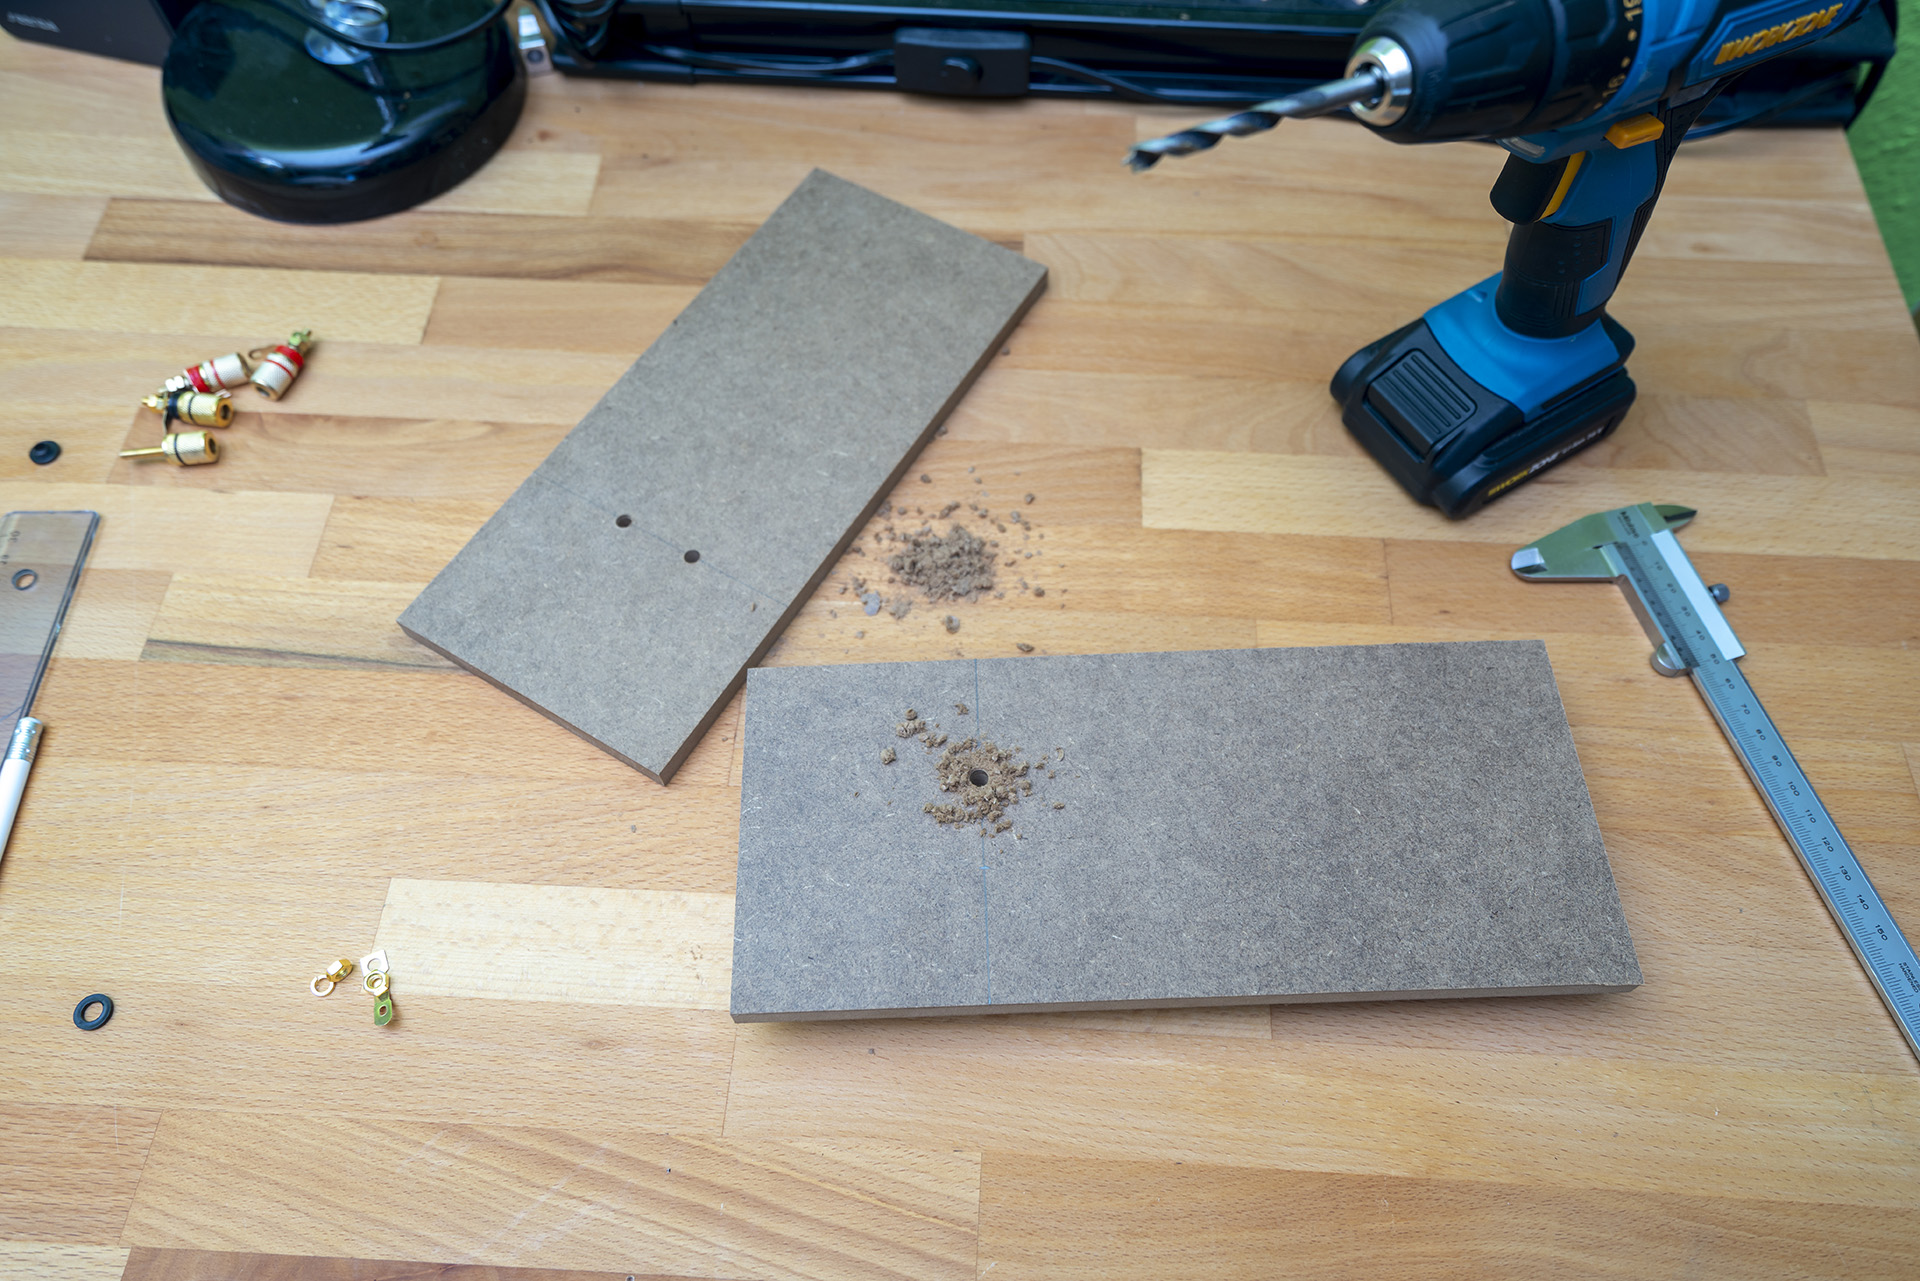
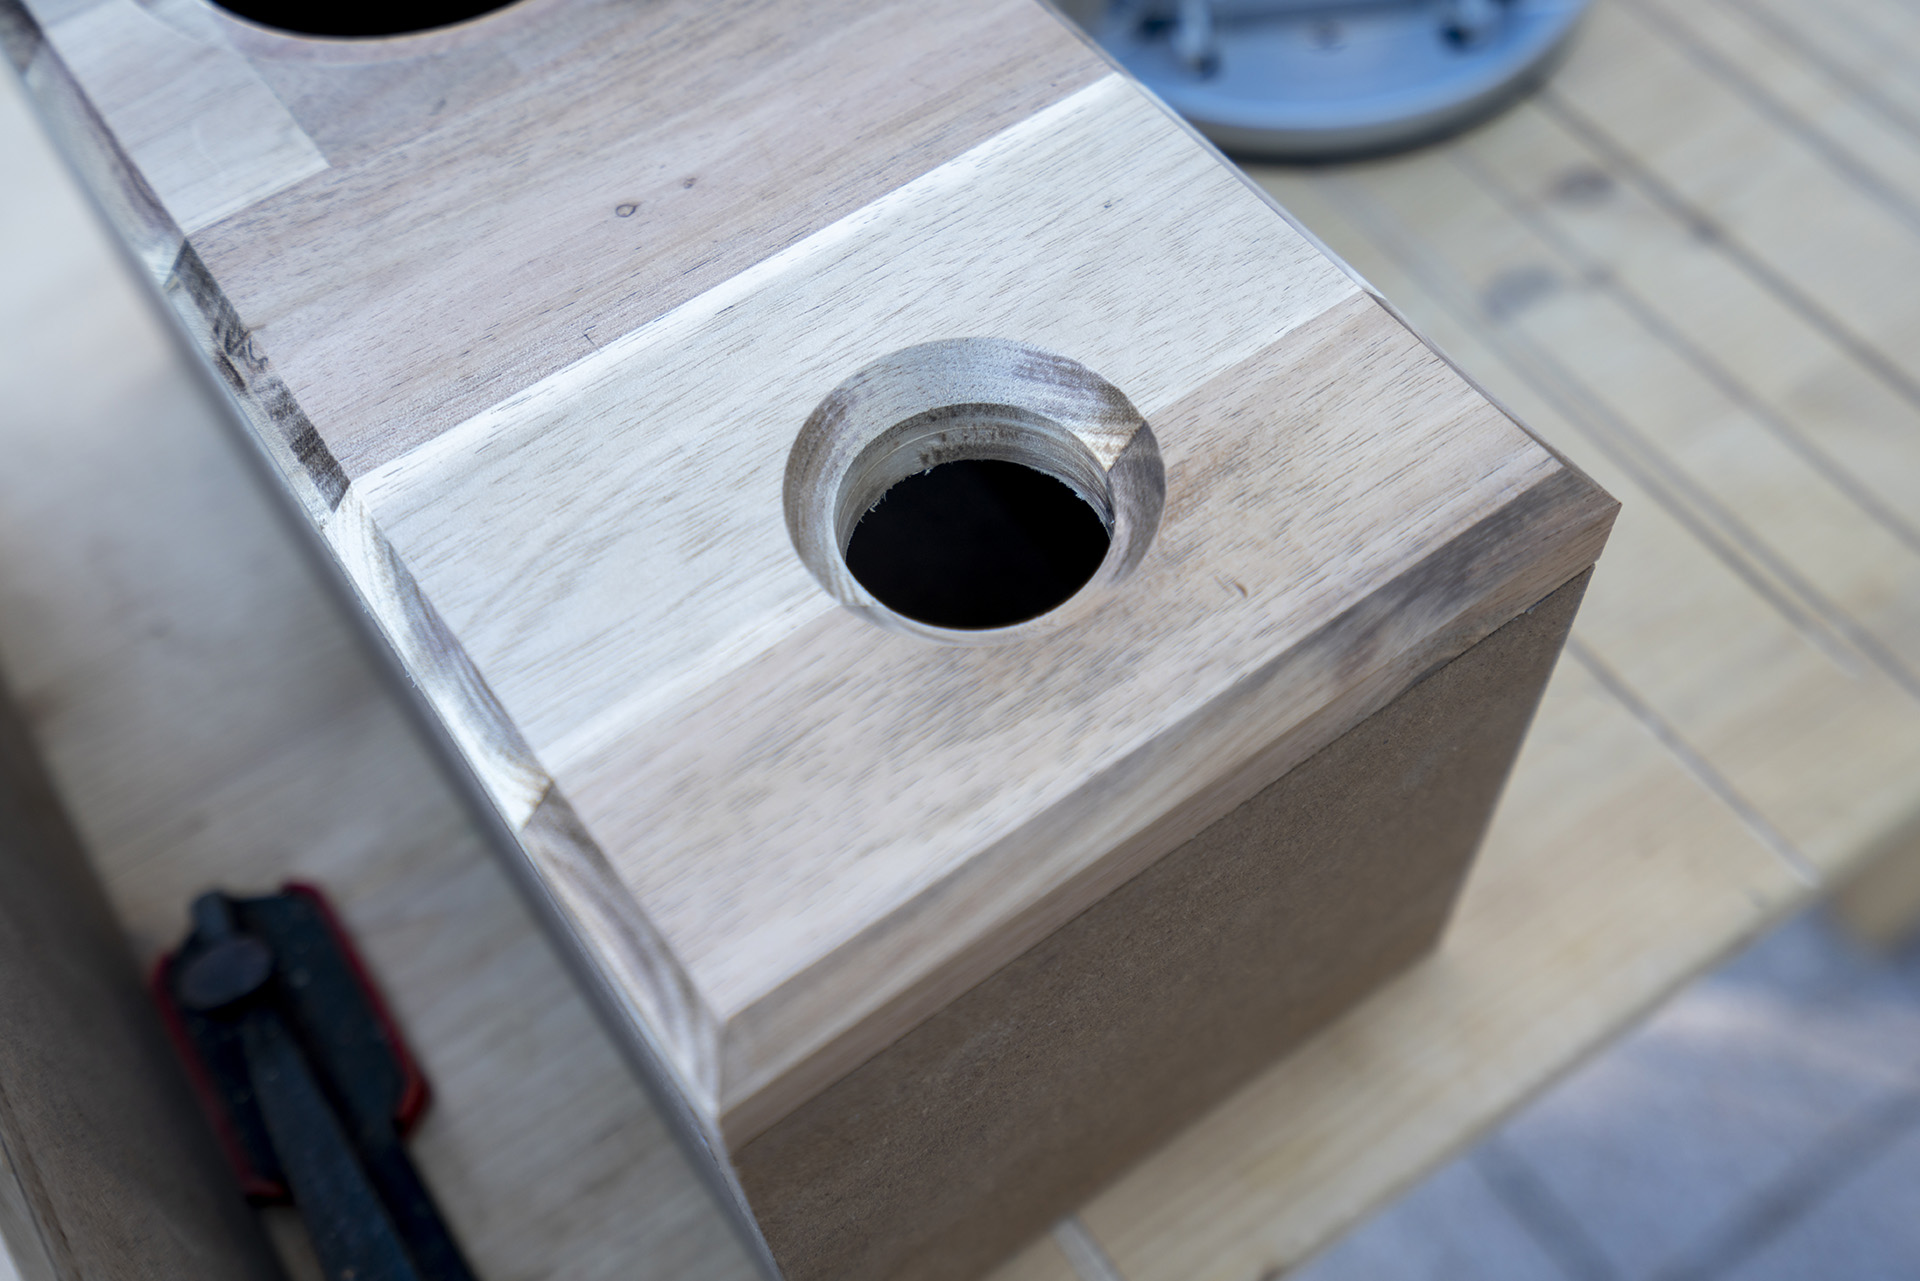
Drilling Terminal Holes
In order to avoid having to drill holes after having assembled the boxes, which would be a lot less accurate, I went ahead and drilled the holes required for the speaker terminals as one of the very first steps. This was simply done with a 6mm drill bit and a cordless drill.


Assembling the MDF Enclosures
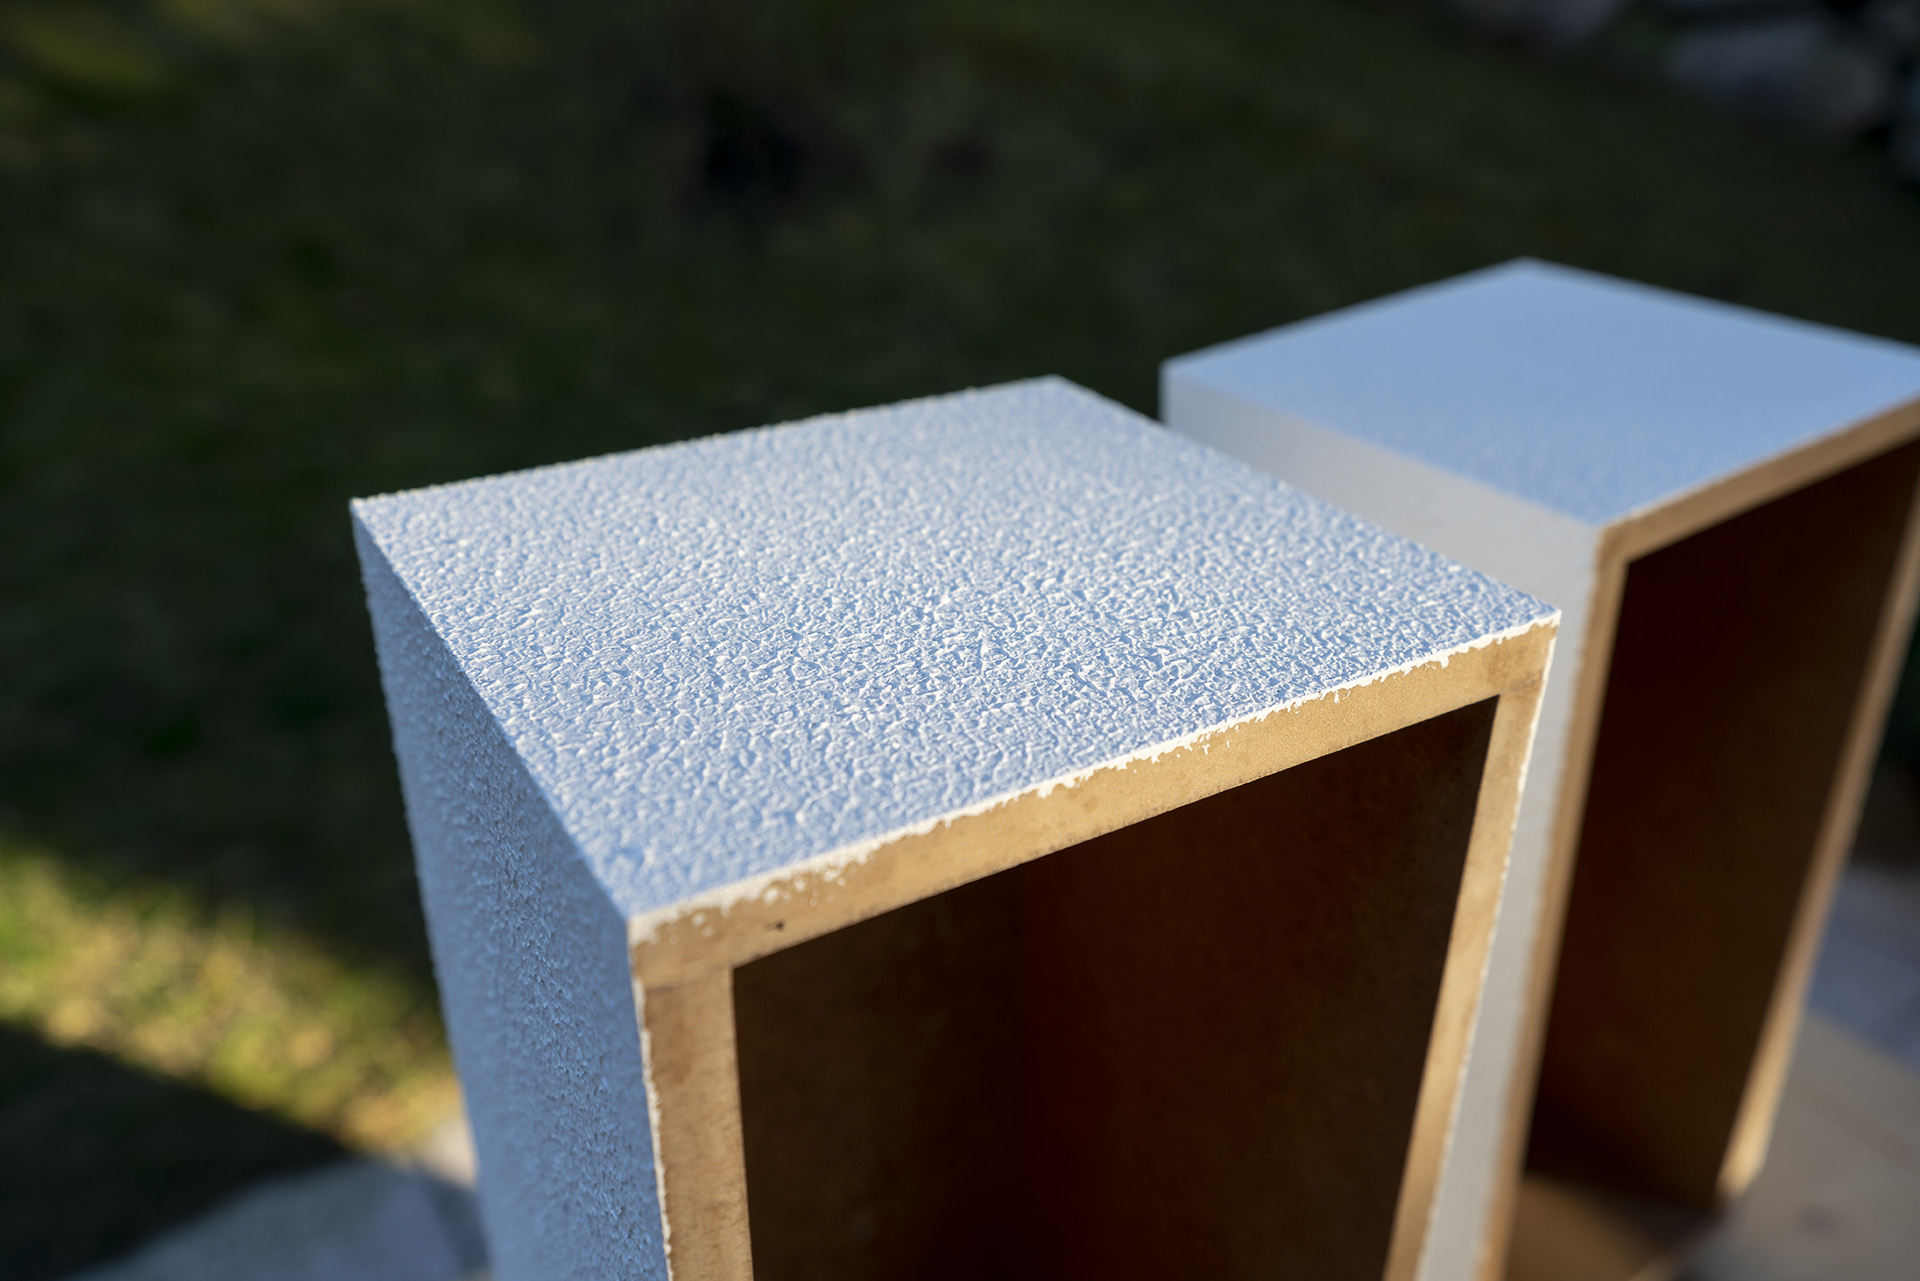
At this point, I was ready to assemble the individual pieces of MDF into a pair of boxes. To do this, I applied some wood glue on all the joining faces and quickly put everything in clamps. This was the quickest solution and it would definitely be strong and durable enough. Any inaccuracies in edge alignment could easily be sanded off and would be covered up by the finish of choice. But more on that later.
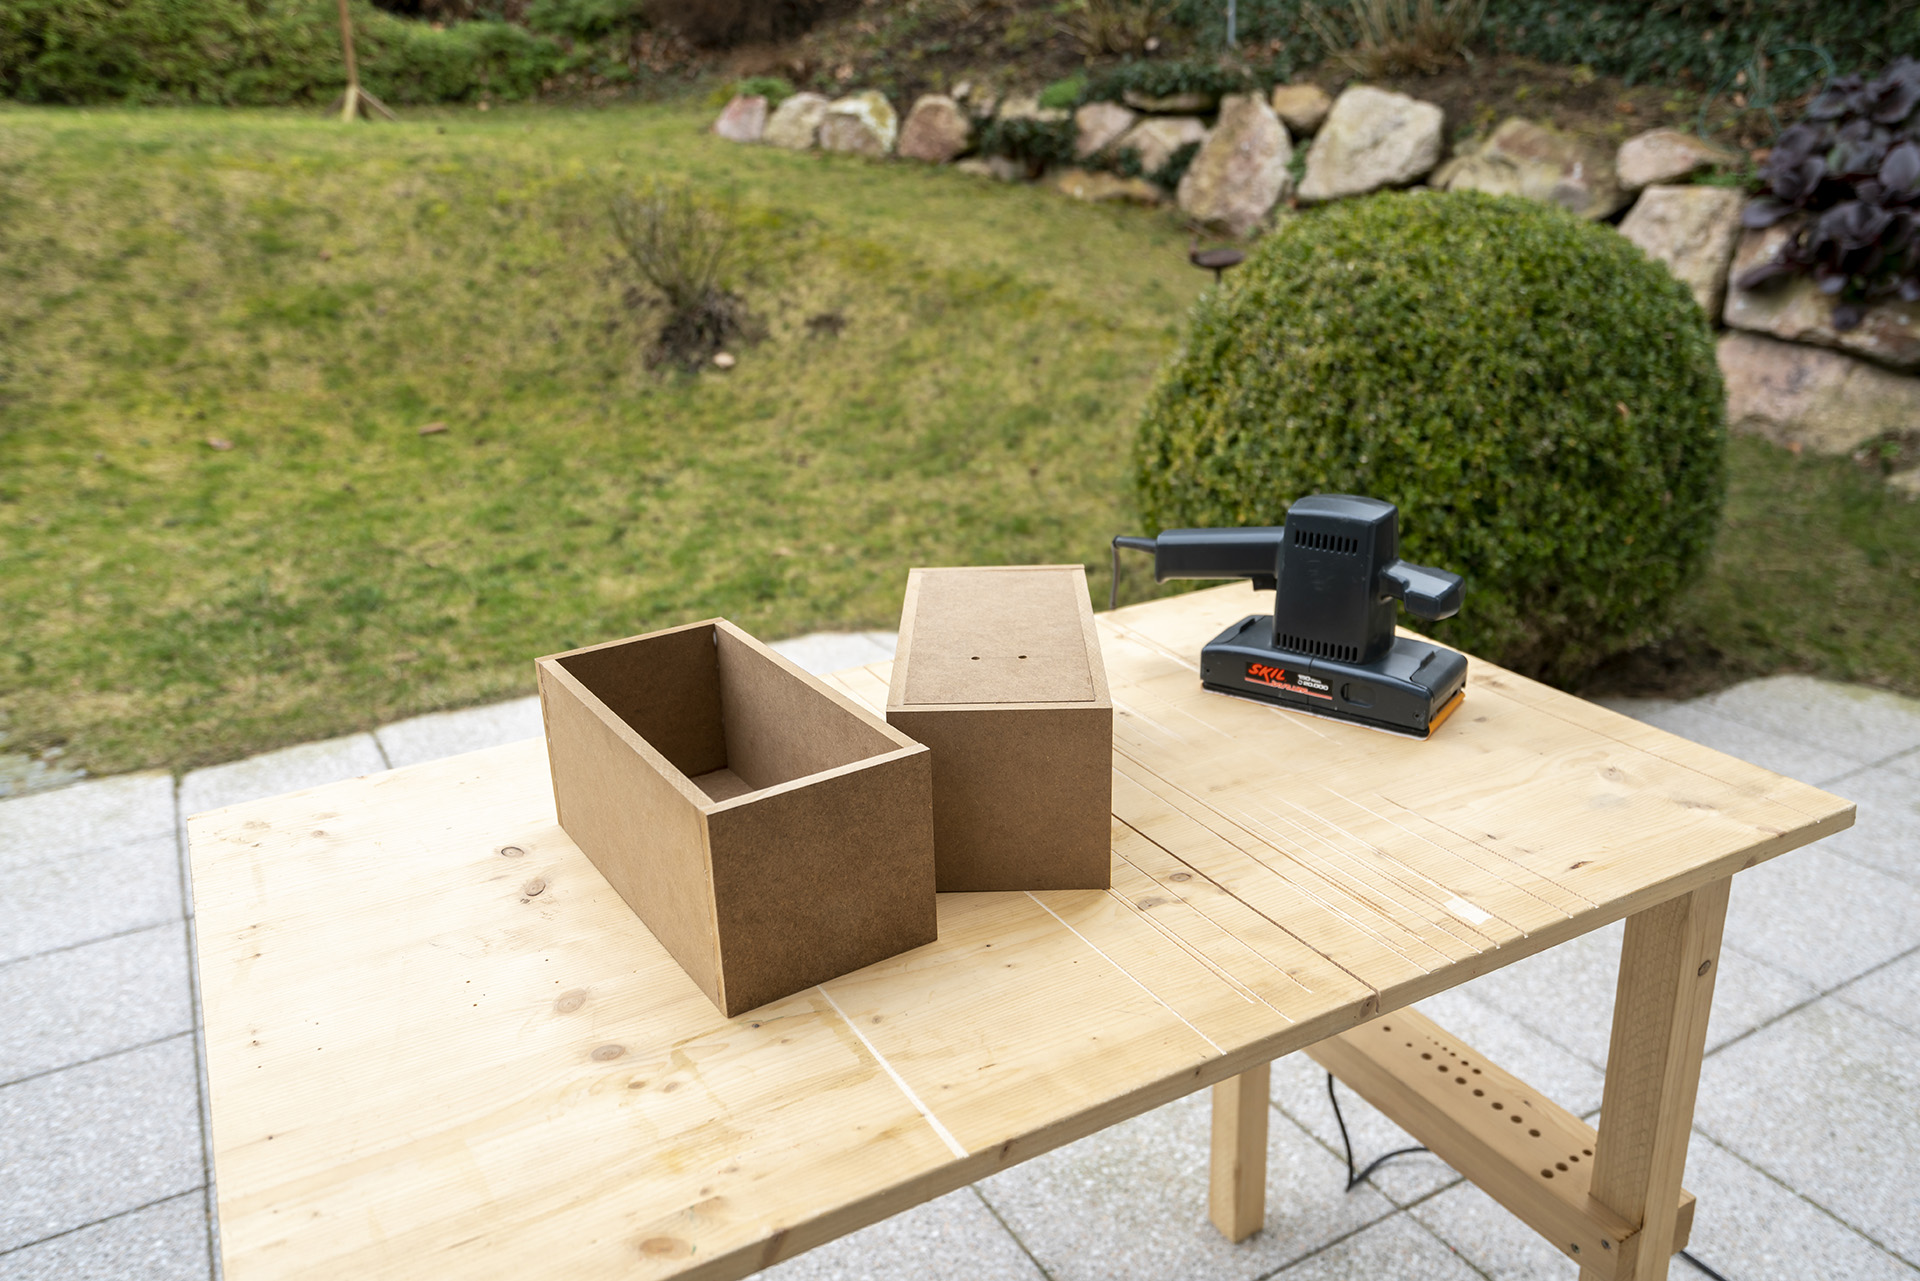
As you can tell from the image above showing the boxes after glueing them up, there were some of the aforementioned inaccuracies in the edge alignment. For this reason, I went outdoors with my MDF boxes, a sander and some sanding paper and sanded off most of the protruding edges and faces.
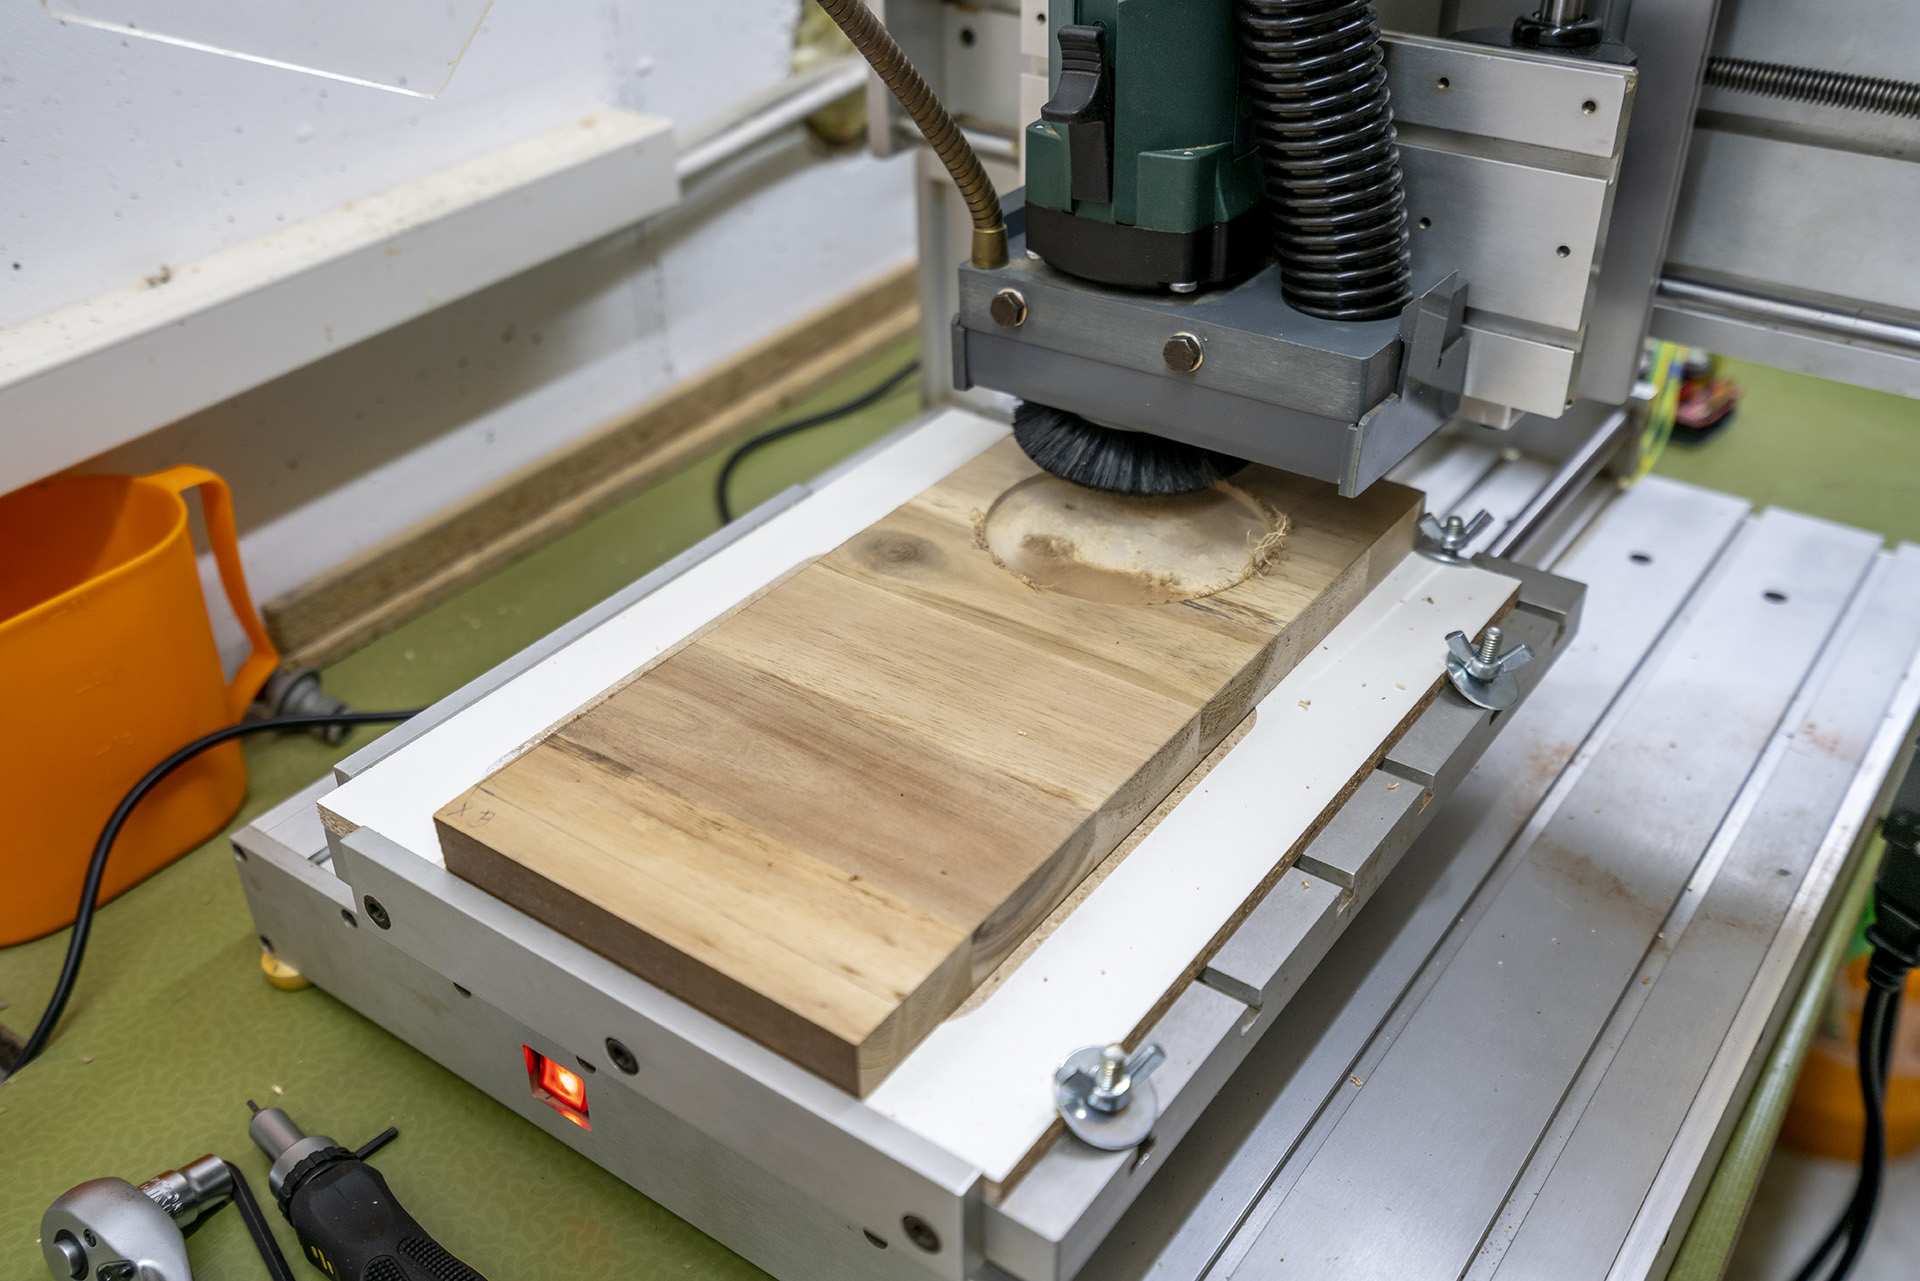
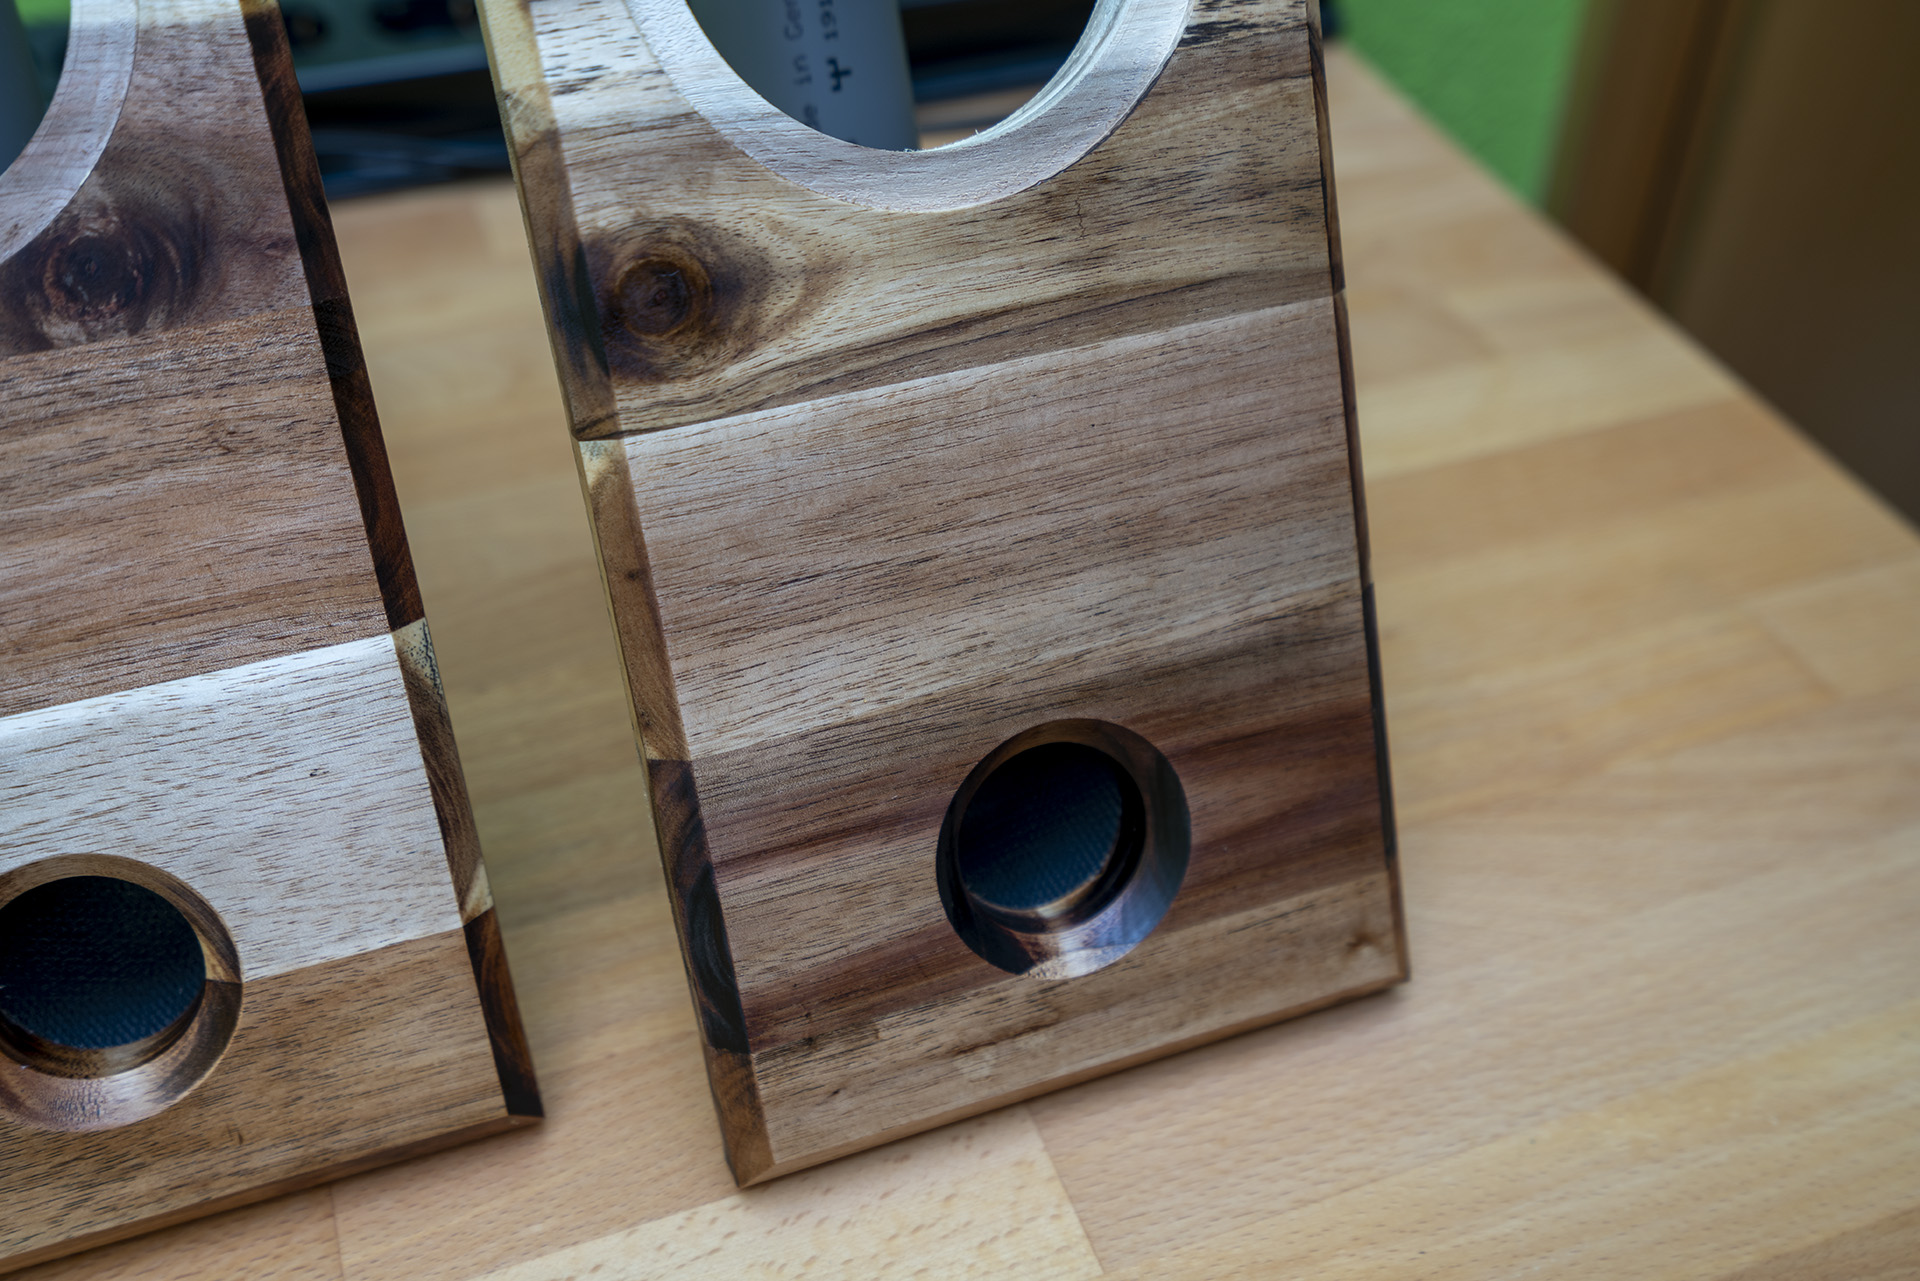
CNC Routing the Baffles
Just like some of my earlier projects, I used acacia wood for the baffle of the enclosures. I really like the look of the wood and this choice would also ensure that the speakers fit the overall look of my room well.
To guarantee a perfect fit of the recessed drivers as well as a perfect cutout for the port I decided to route these using my brother’s CNC router. The exact required dimensions for the recesses and cutouts can easily be found in the driver’s datasheet and I would also recommend doing a test run on some cheaper material which I did on a similarly sized piece of 19mm MDF to dial in the last corrections in sizes.
Of course, I couldn’t stop myself from test fitting the drivers and laying the baffles in place to look at the overall progress. At this point, the baffles are still purposely left oversize and clearly aren’t finished yet.
Flush Trimming and Chamfering
The baffles were a bit oversized in order to be able to flush-trim them to fit perfectly on the fronts of the MDF enclosures using a flush-trim bit on the router. For this purpose, I temporarily attached the baffle to the enclosure using a bit of hot glue which is more than strong enough to hold them in place but easy to remove from the enclosures.
While the baffles were stuck in place, I used the opportunity to also chamfer all four outer edges as well as the perimeter of the port cutout using a 45° chamfering bit on the router which gave the enclosures a much more put-together appearance.

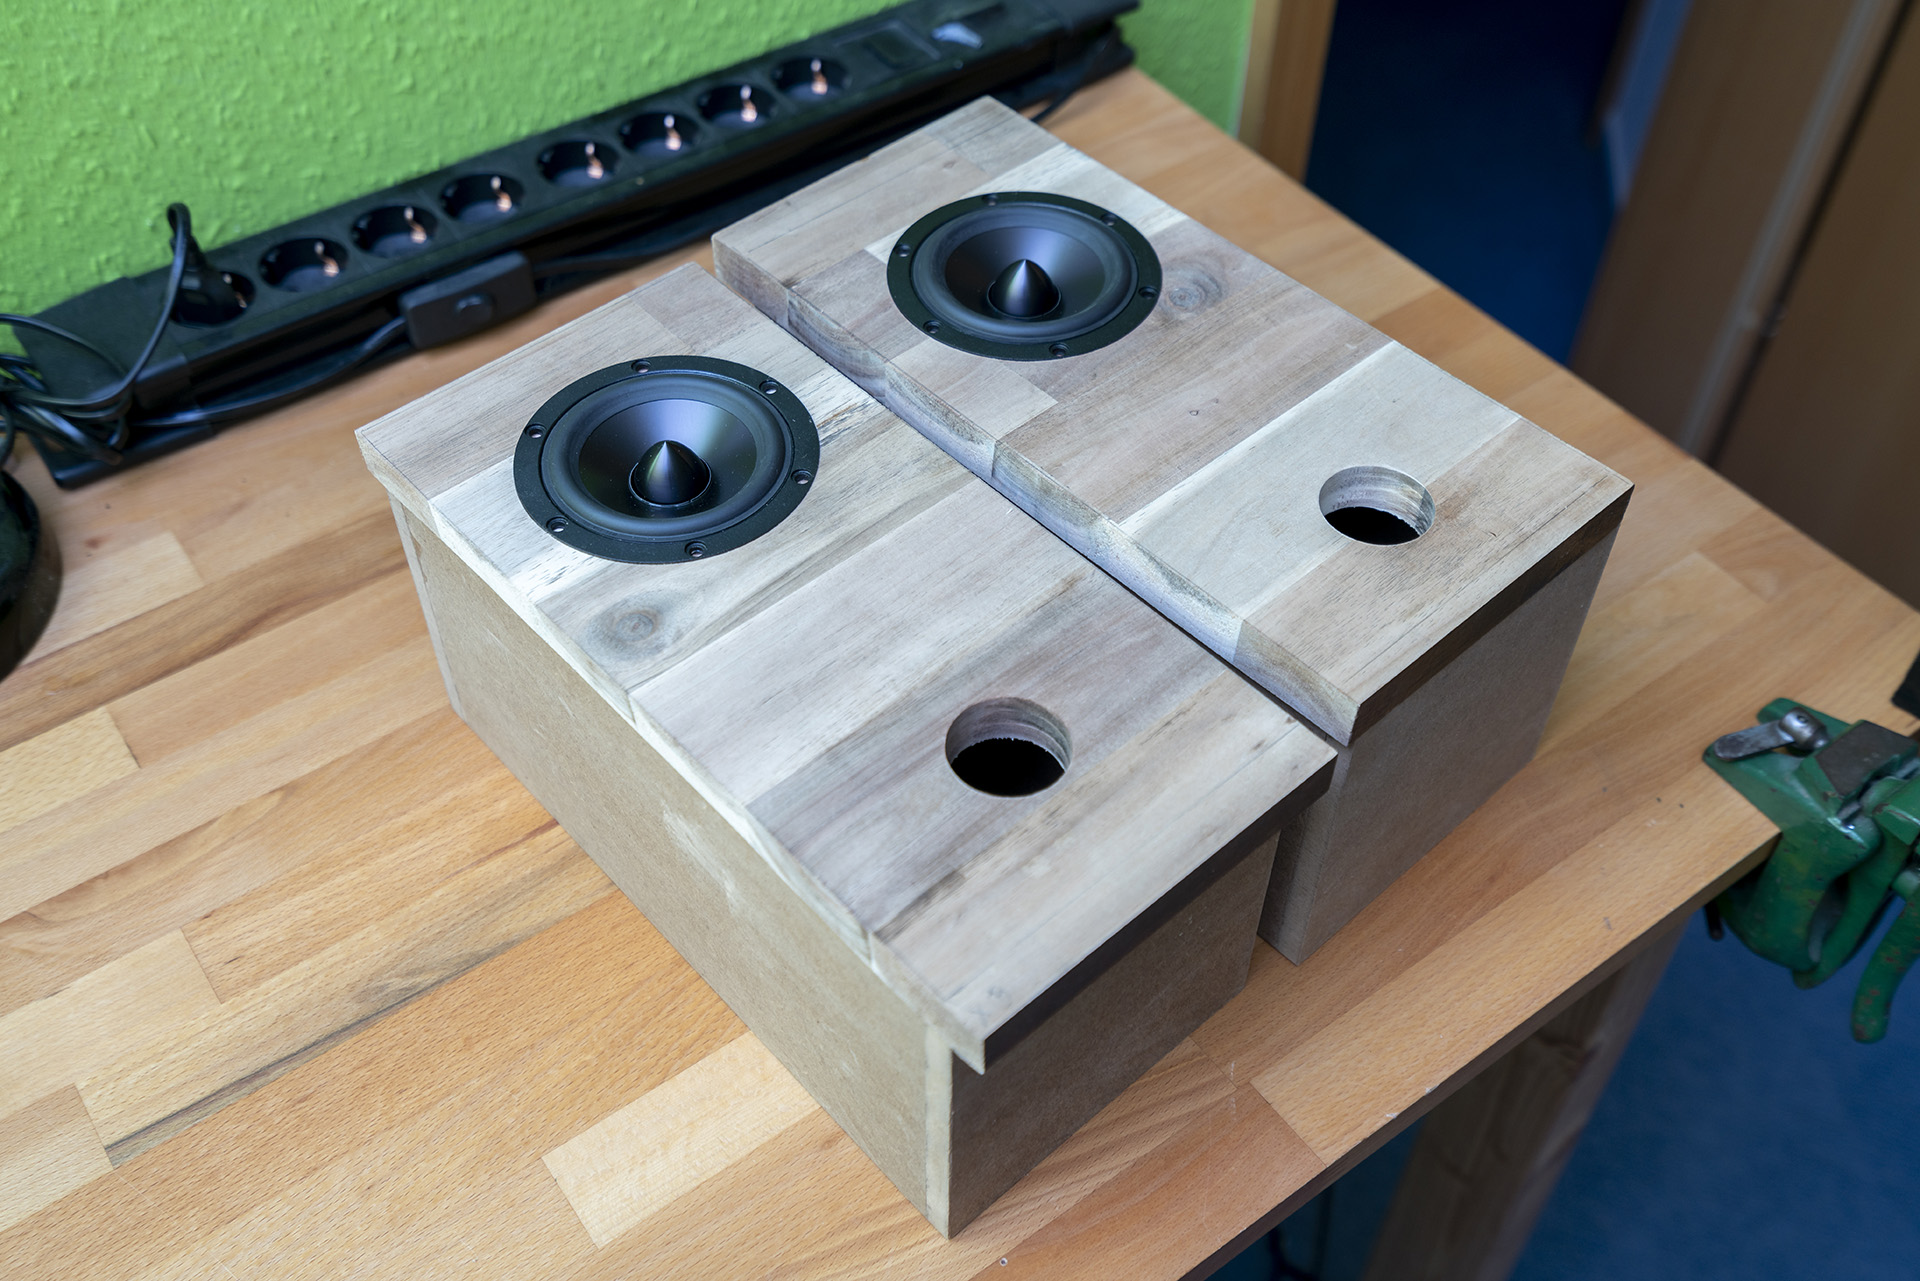
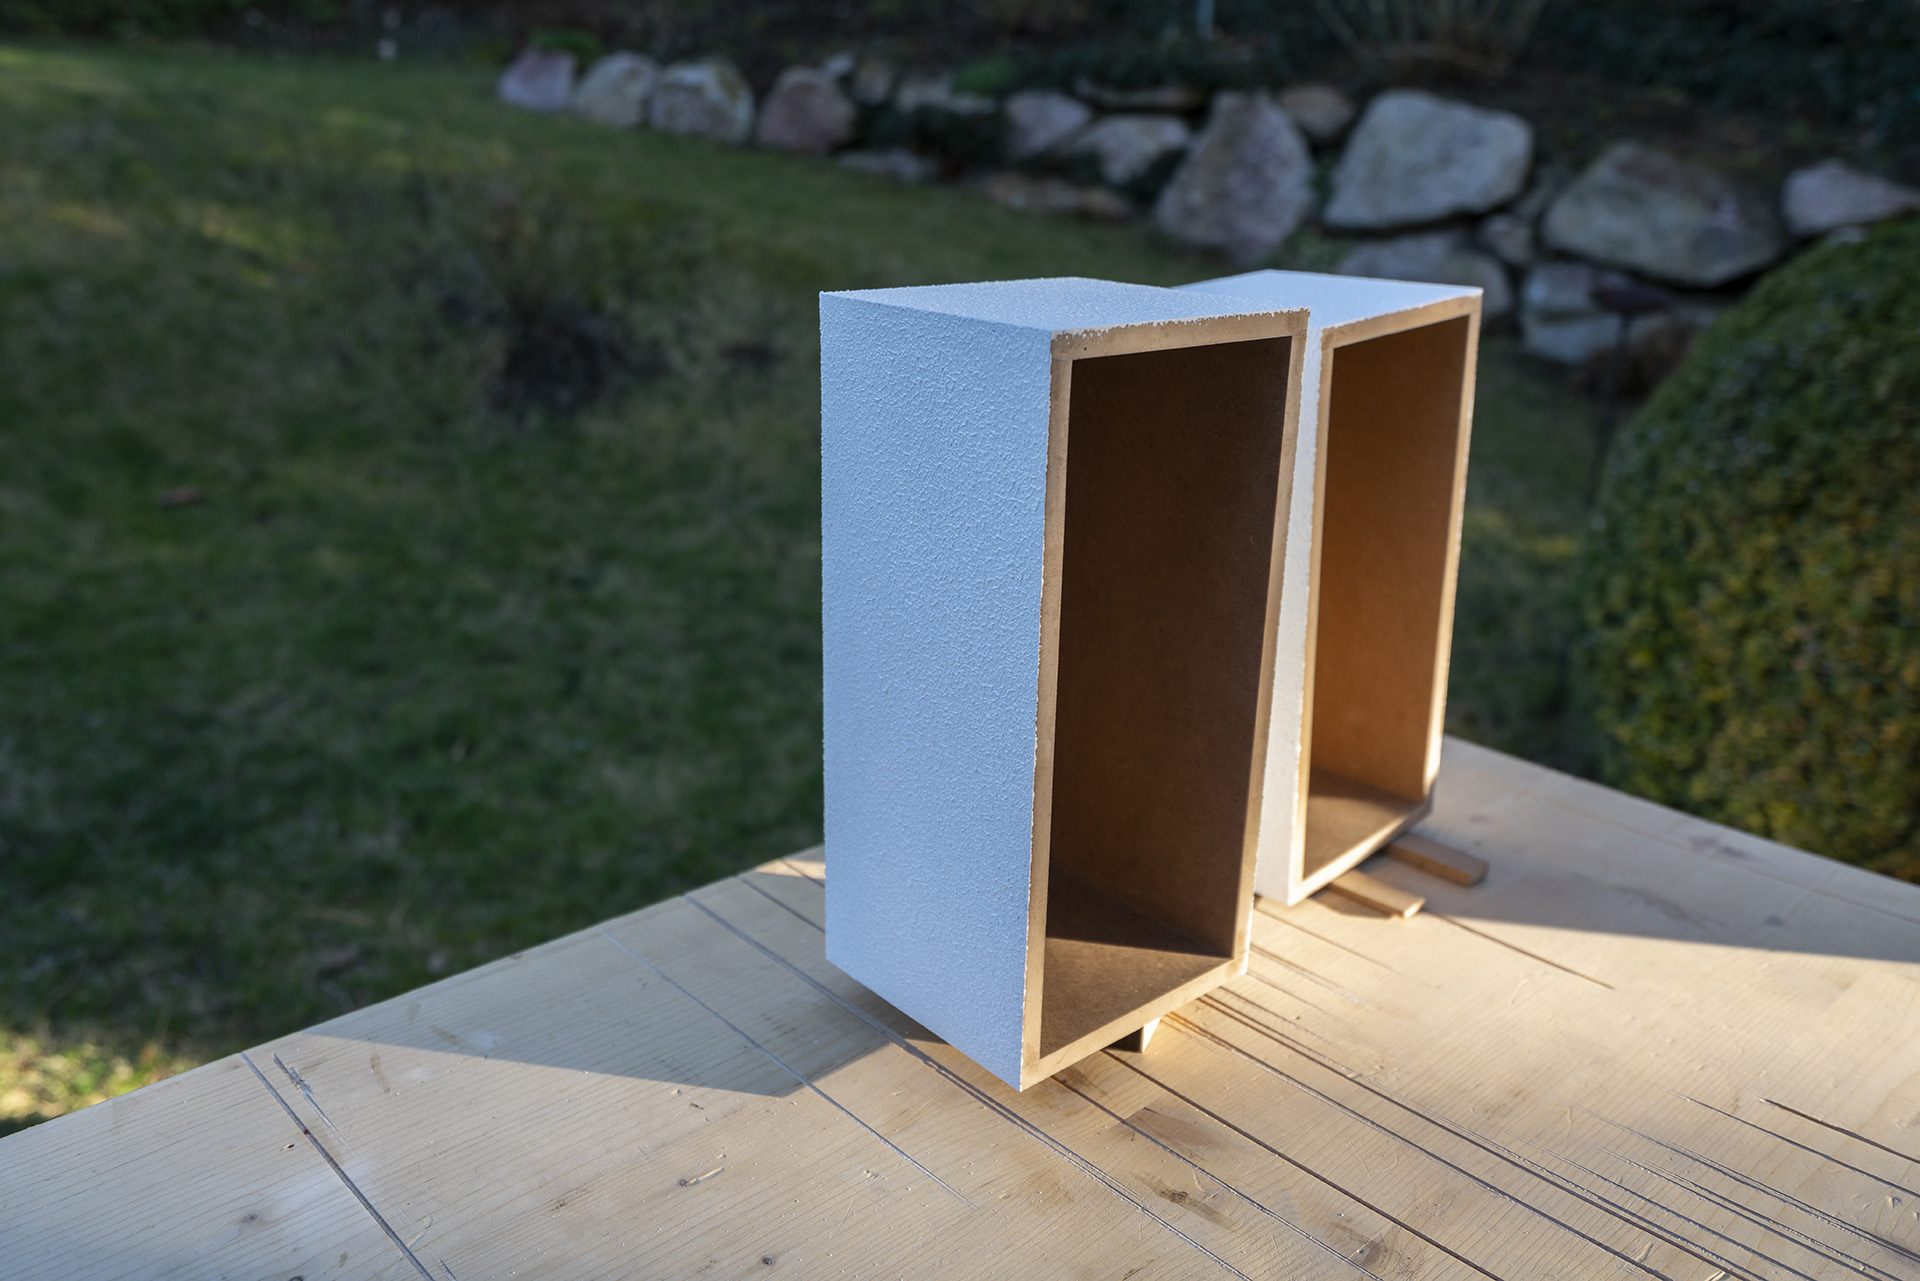
Finishing the enclosures with DuraTex
At this point pretty much all the woodworking for this project had been completed and it was time to finish the enclosures. For this purpose, SoundImports.eu kindly provided me with a can of DuraTex texture coating, so I could try it out on these speakers. With the Roller Grade Coating Kit came a 1kg can of white texture coating as well as a small textured paint roller.
The DuraTex texture coating was very different to anything I had ever used before. The greatest thing about it for me was definitely its ease of use. It wasn’t necessary to cover the MDF with some additional base coat which is what needs to be done with most other paints on MDF since it soaks up liquids like crazy. I applied a generous pure coat of DuraTex using the texture roller first and then found out that it dries very quickly which was clearly a good thing because I was quickly running out of daylight.
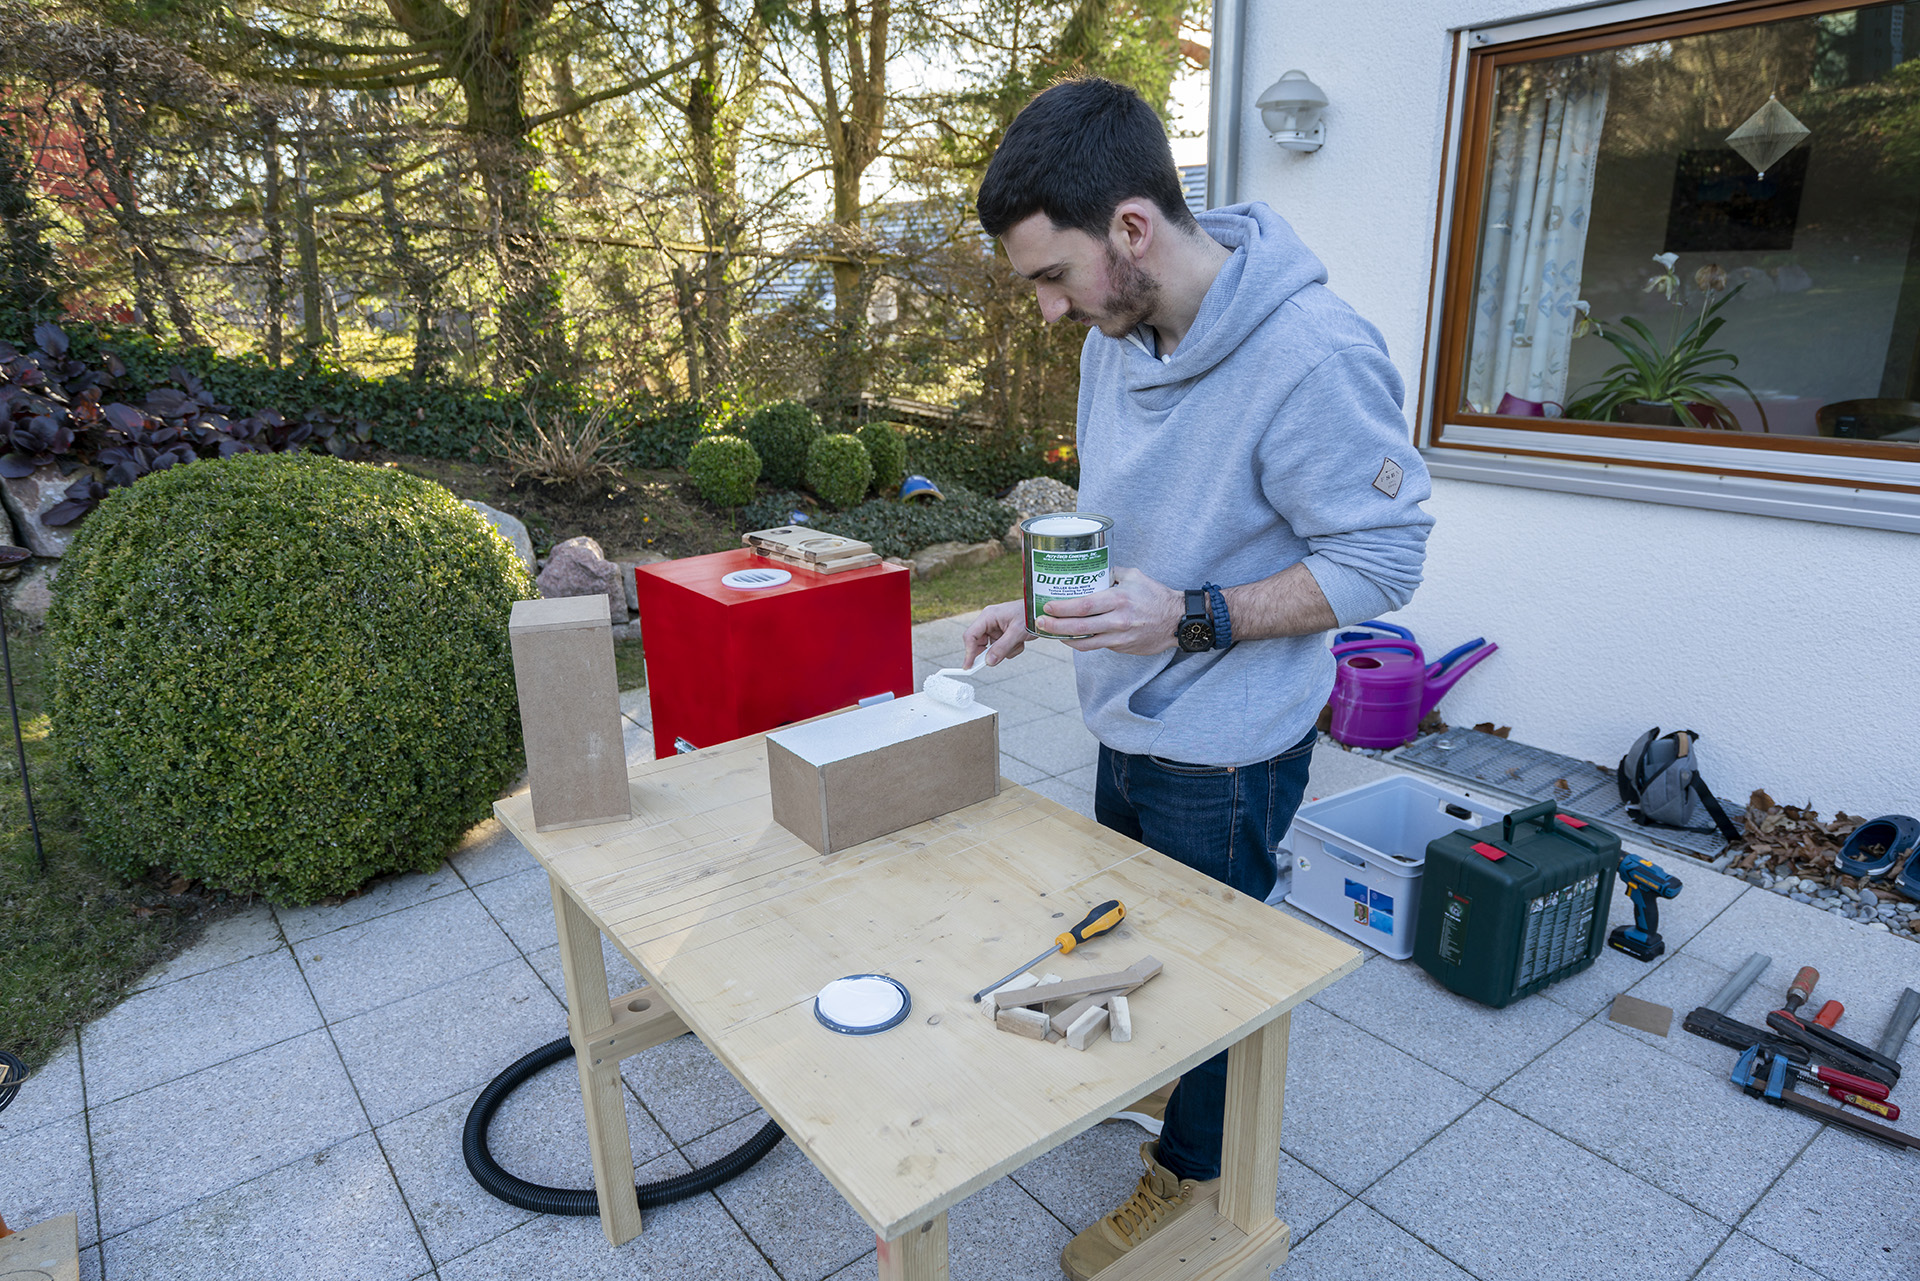
After the first coat had dried, I wasn’t happy with the finish yet since all the unevenness of my glue-up had been covered up, however, there were a lot of small cracks that formed on the surface of the texture coating during the drying process. Since the DuraTex texture coating is water-based it can easily be diluted with a bit of water which is what I did for my thinner second and third coats which I could apply shortly after one another. After the third coat, I was pretty happy with the finish I had achieved in very little time.
The textured coating is something very different from what I had done with my previous projects and turn the speakers into an eye-catcher. But have a look for yourself:
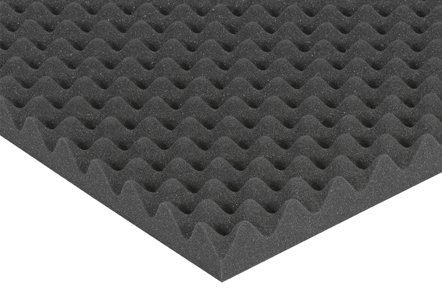
Dampening the Enclosure
In order to reduce or, ideally, eliminate any reflections and standing waves within the enclosures I covered all the inner walls with some acoustic foam. I cut the foam to size using a box cutter and then attached it to the inside walls using a bit of hot glue.

Wiring the Terminals
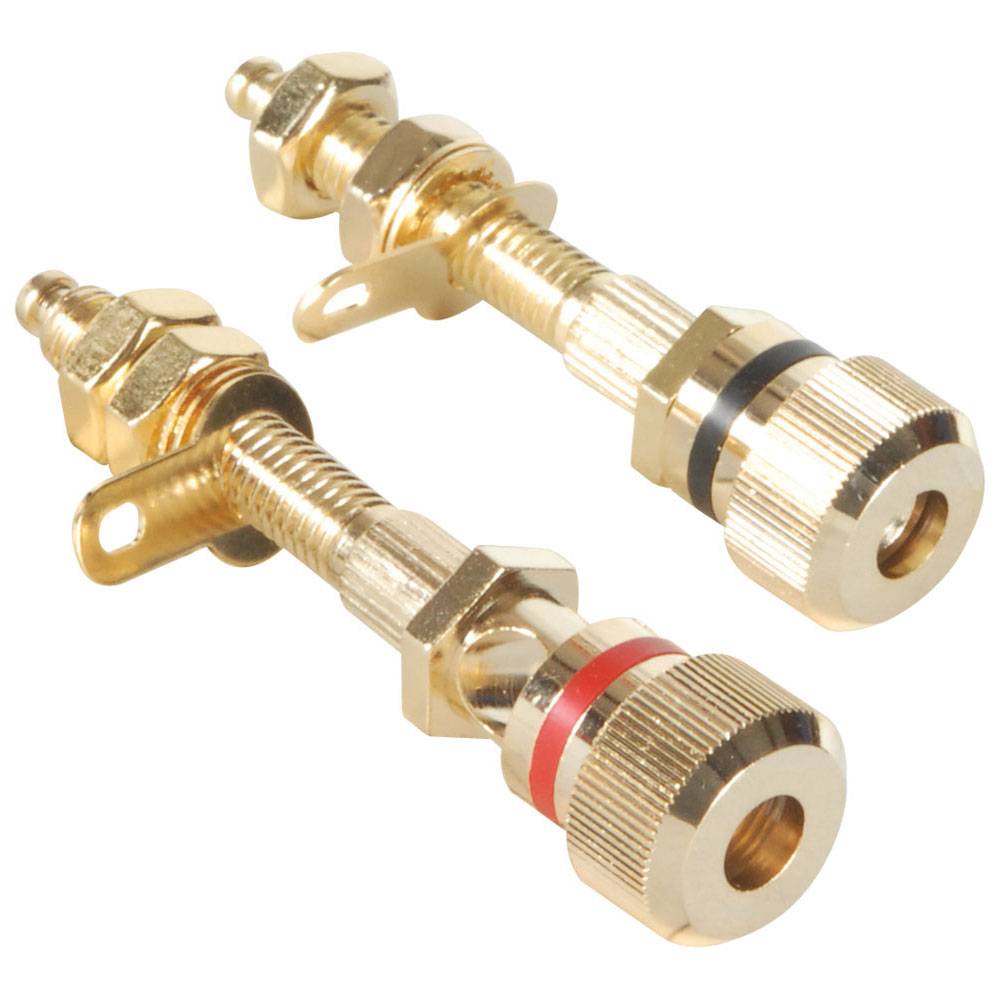
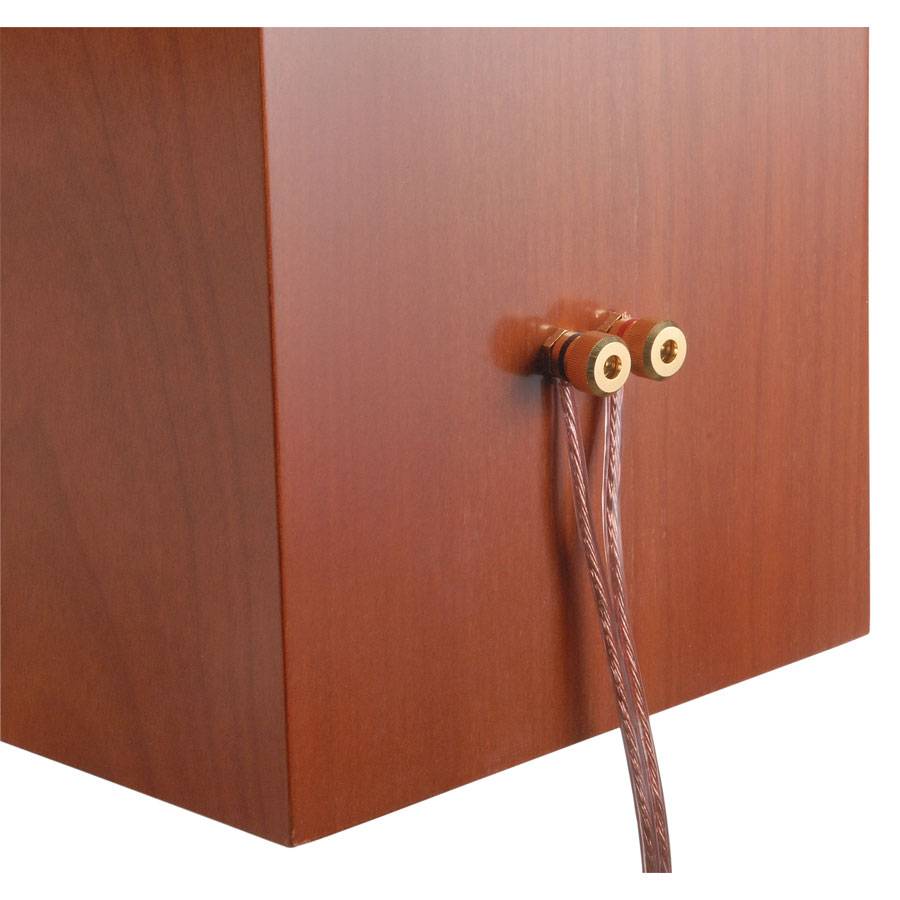
I would soon be closing the front of the MDF enclosures with the baffles, so this was the last chance to easily access the inside of the boxes. For this reason, I screwed the 4mm speaker terminals into the holes I had previously drilled. I then soldered a short length of speaker wire to the solder tabs of the terminals. These wires would later be soldered onto the driver.

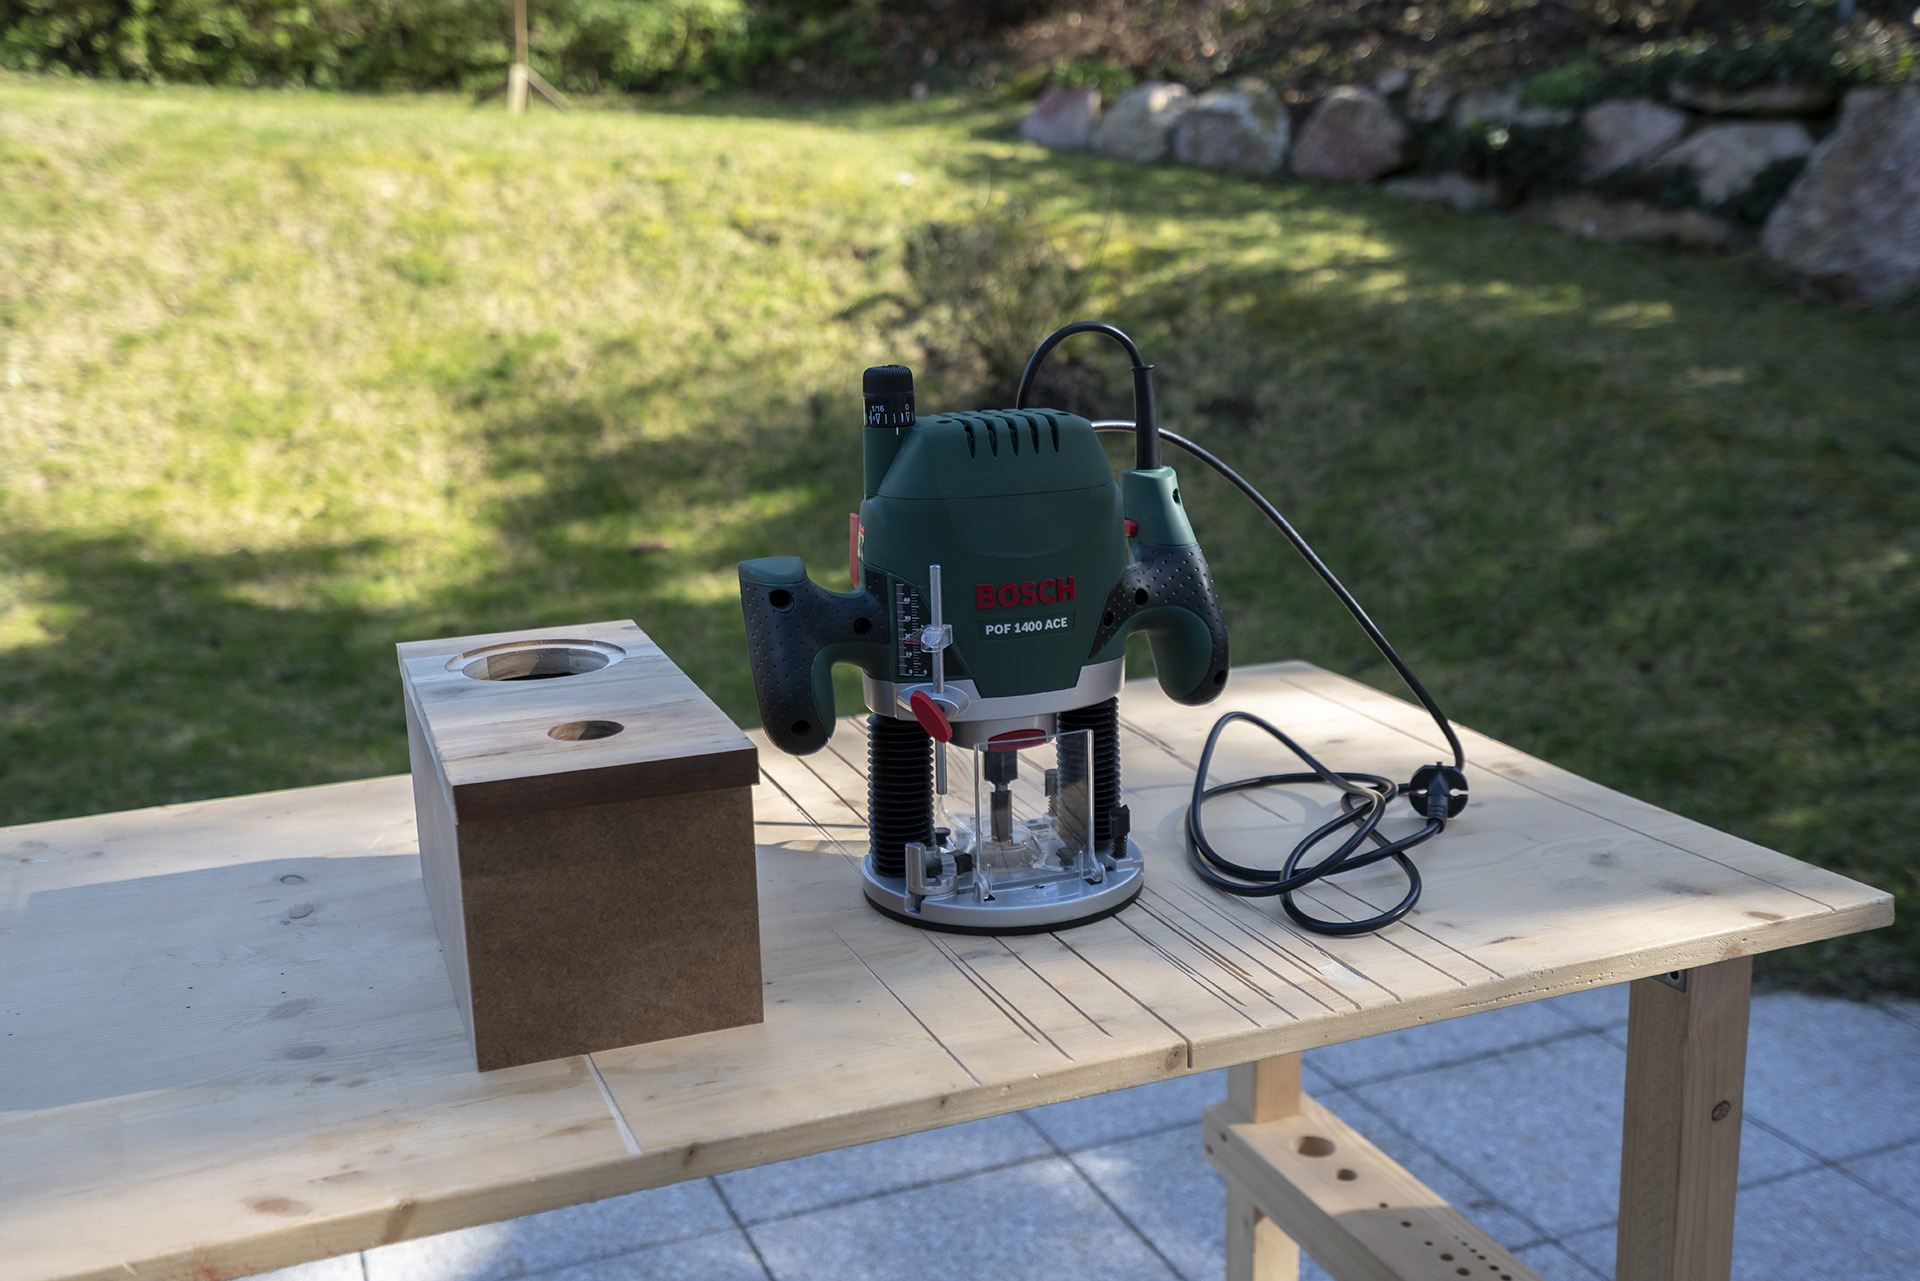
Making and Attaching the Port
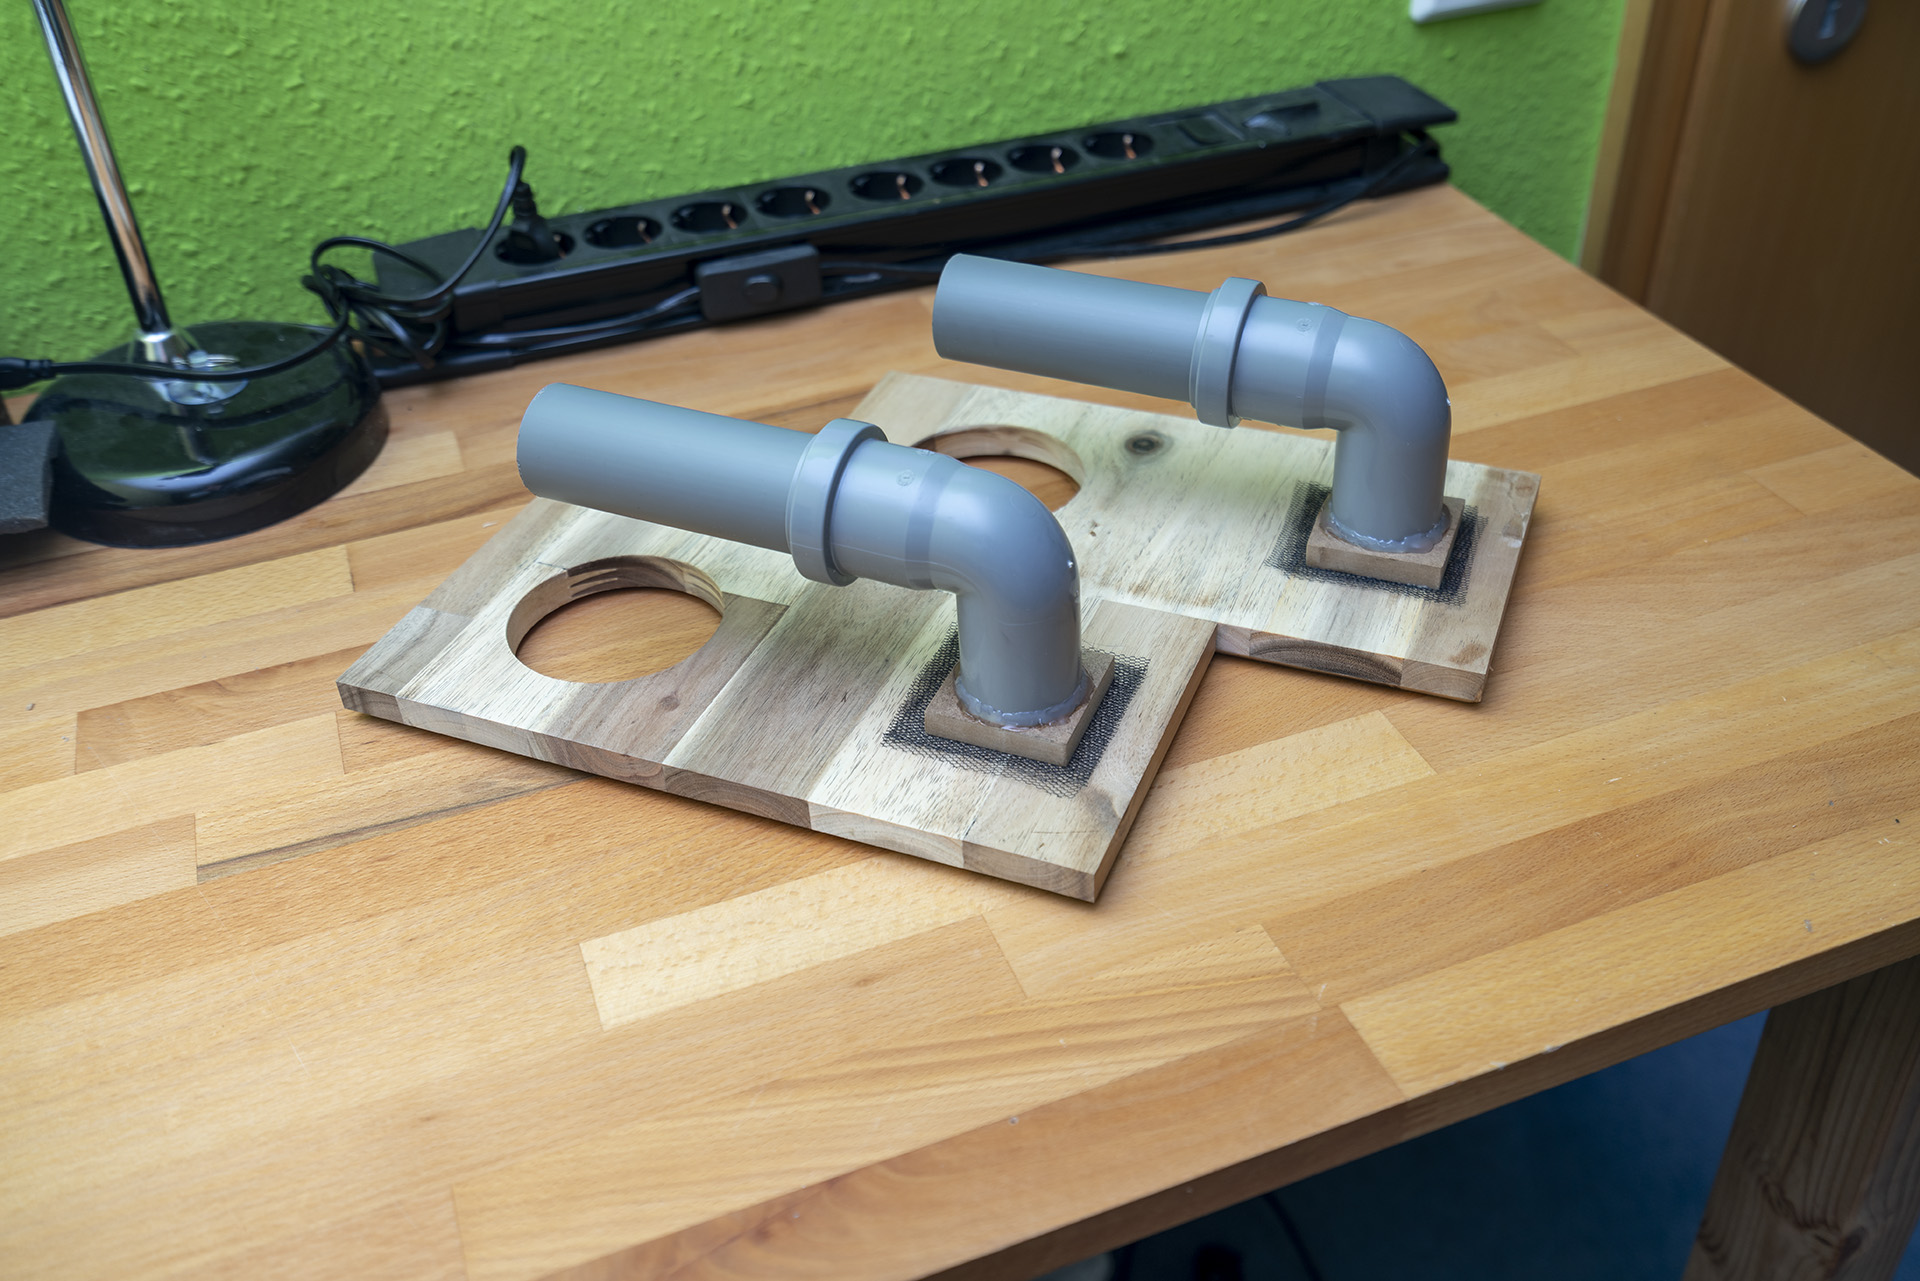
As I already mentioned in the designing phase above, I decided to use some DN40 PVC pipes as the port for these speakers. I grabbed the straight 250mm long pieces of pipe as well as some 87° elbow pieces that I had bought from the local hardware store and got to work.
From the 250mm overall length of the pipe, I first subtracted the 12mm of Acacia wood which would be added to the front end of the pipe because this also adds to the overall port length. I then plugged the straight piece of pipe into the elbow piece and marked off the remaining 238mm. I then cut the PVC pipe at this mark using a handsaw.

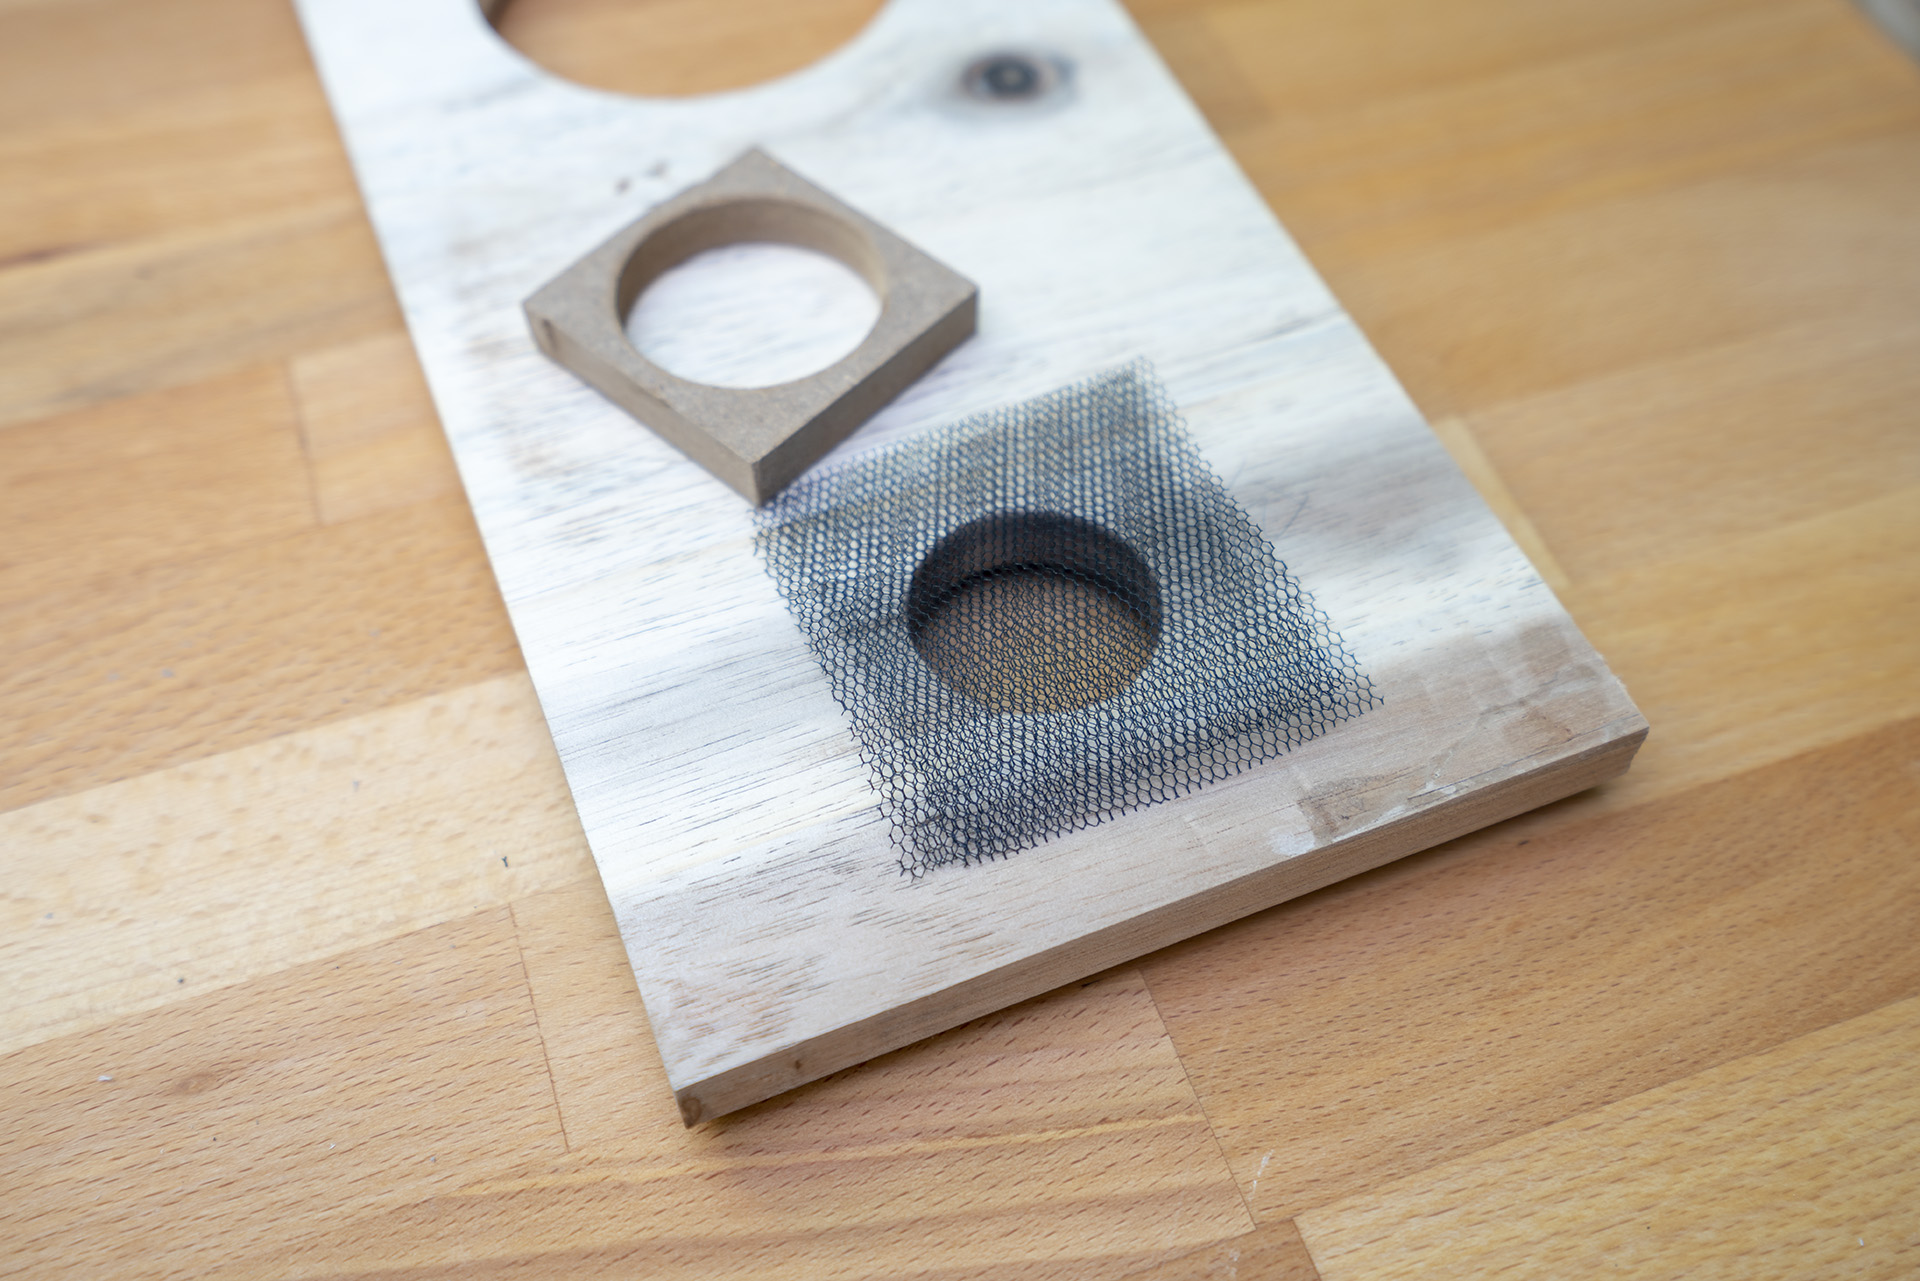
In order to be able to attach the PVC port to the front baffles, I made an adapter from a small piece of MDF. In this piece of MDF, I simply drilled a hole 40mm in diameter, using a suitable Forstner drill bit.
Like I had also done on the port of my 8″ subwoofer I wanted to cover up the porthole with three layers of black mesh fabric. This leaves the opening well permeable for air yet makes it pretty much impossible to see the grey PVC pipe behind it. I then sandwiched the fabric between the baffle and the MDF adapter, centering the latter perfectly over the slightly smaller hole in the Acacia wood and glued it in place using some wood glue.
After the adapter piece had dried sufficiently, I glued the ports to it using a generous amount of hot glue.
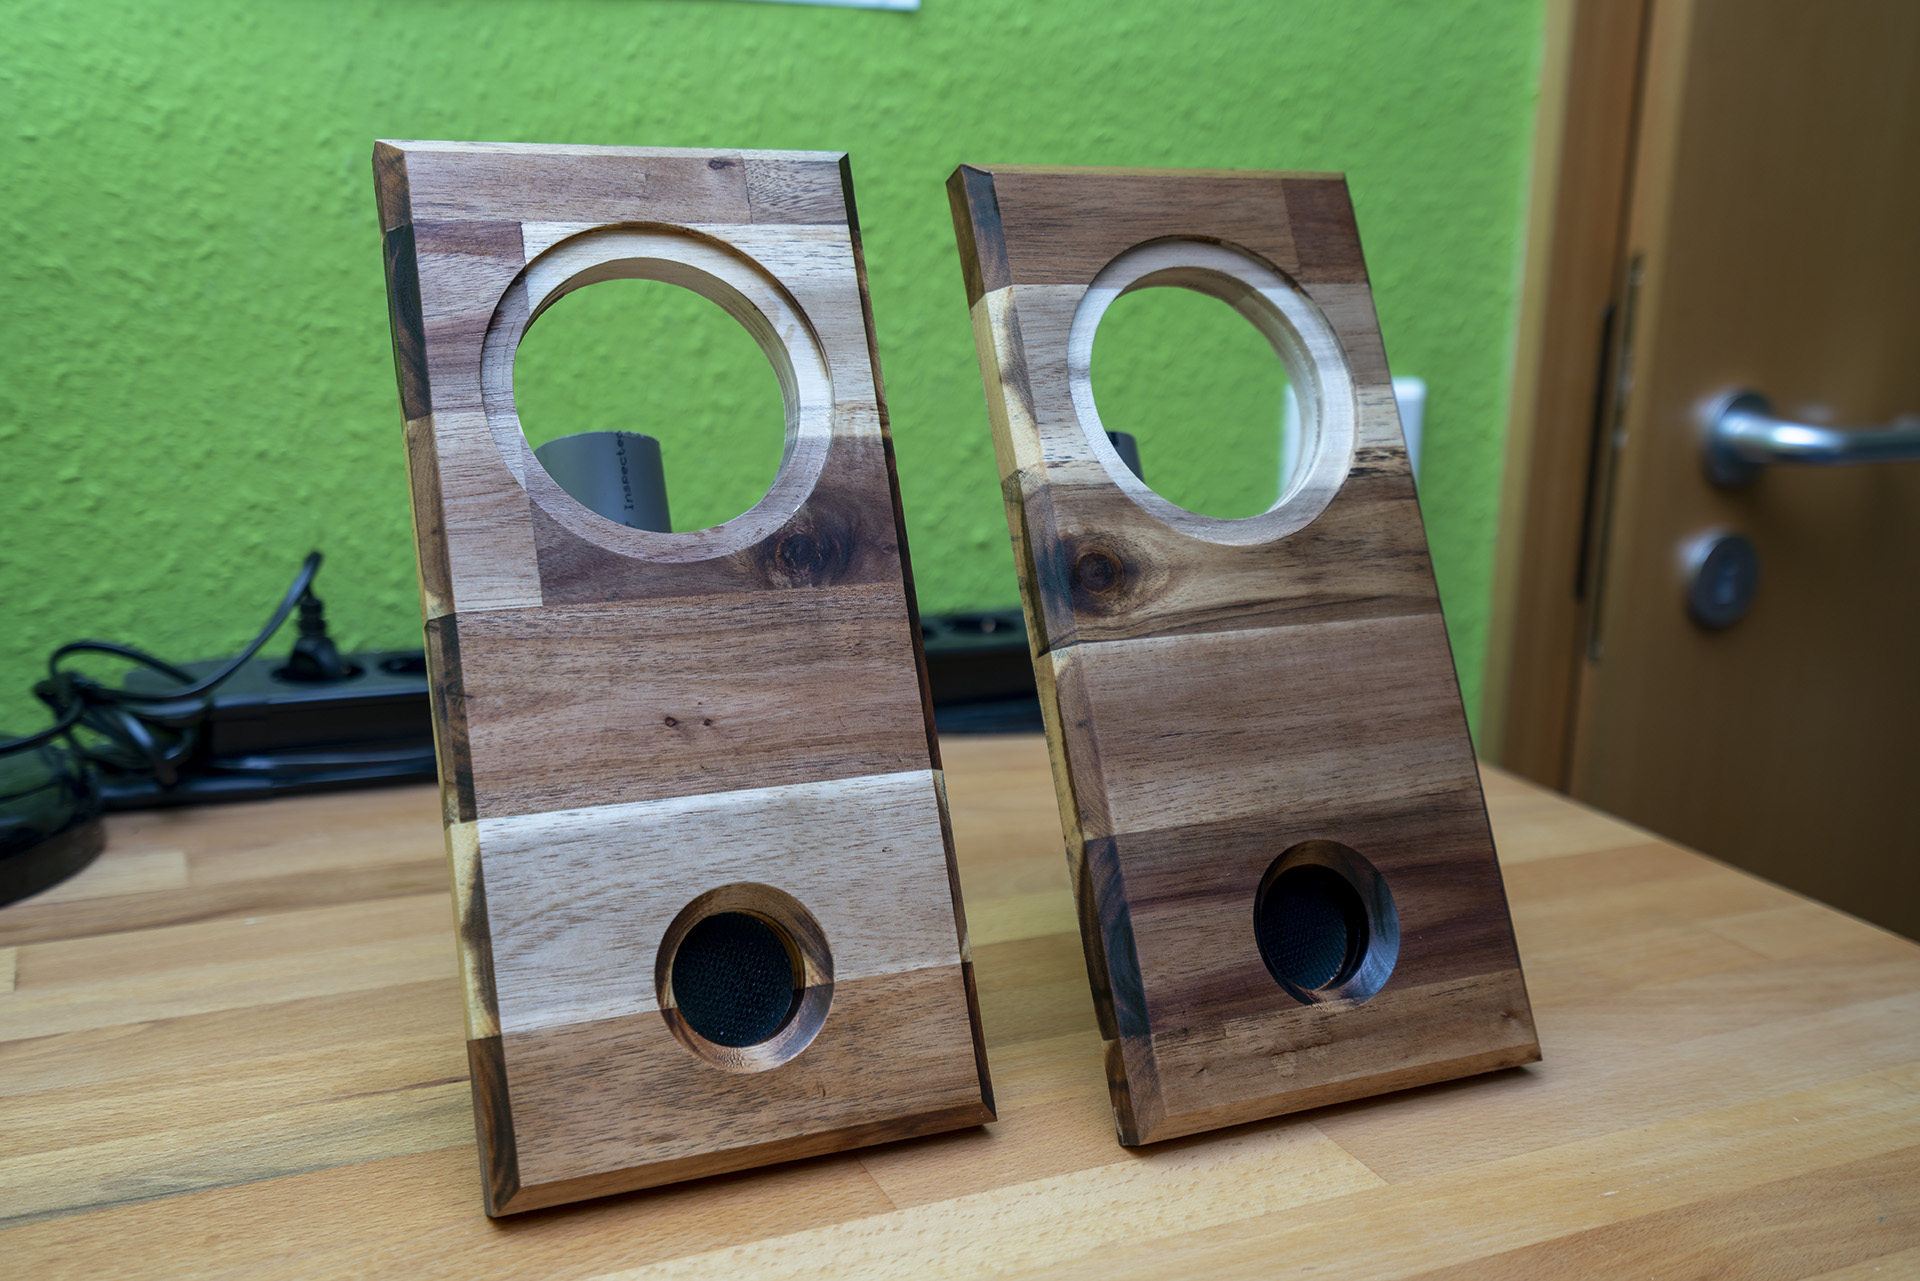
Finishing the Baffles
Now that the construction of the baffles with their ports had been completed as well, I applied a coat of oil to them using a brush. This step was, once again, one of the most satisfying ones; seeing the different types of wood come to life.
Attaching the Baffles and Drivers
Next, I permanently attached the baffles to the MDF enclosures using some wood glue and a lot of pressure in order to avoid having any gaps there.
The last major missing component was now ready to be put in place: the Dayton Audio RS100-4 itself. Since I had already attached a piece of speaker wire to the terminals from the inside, it was only a matter of pre-tinning the other end of the wire as well as the solder tabs on the driver and then attaching everything in the appropriate places.
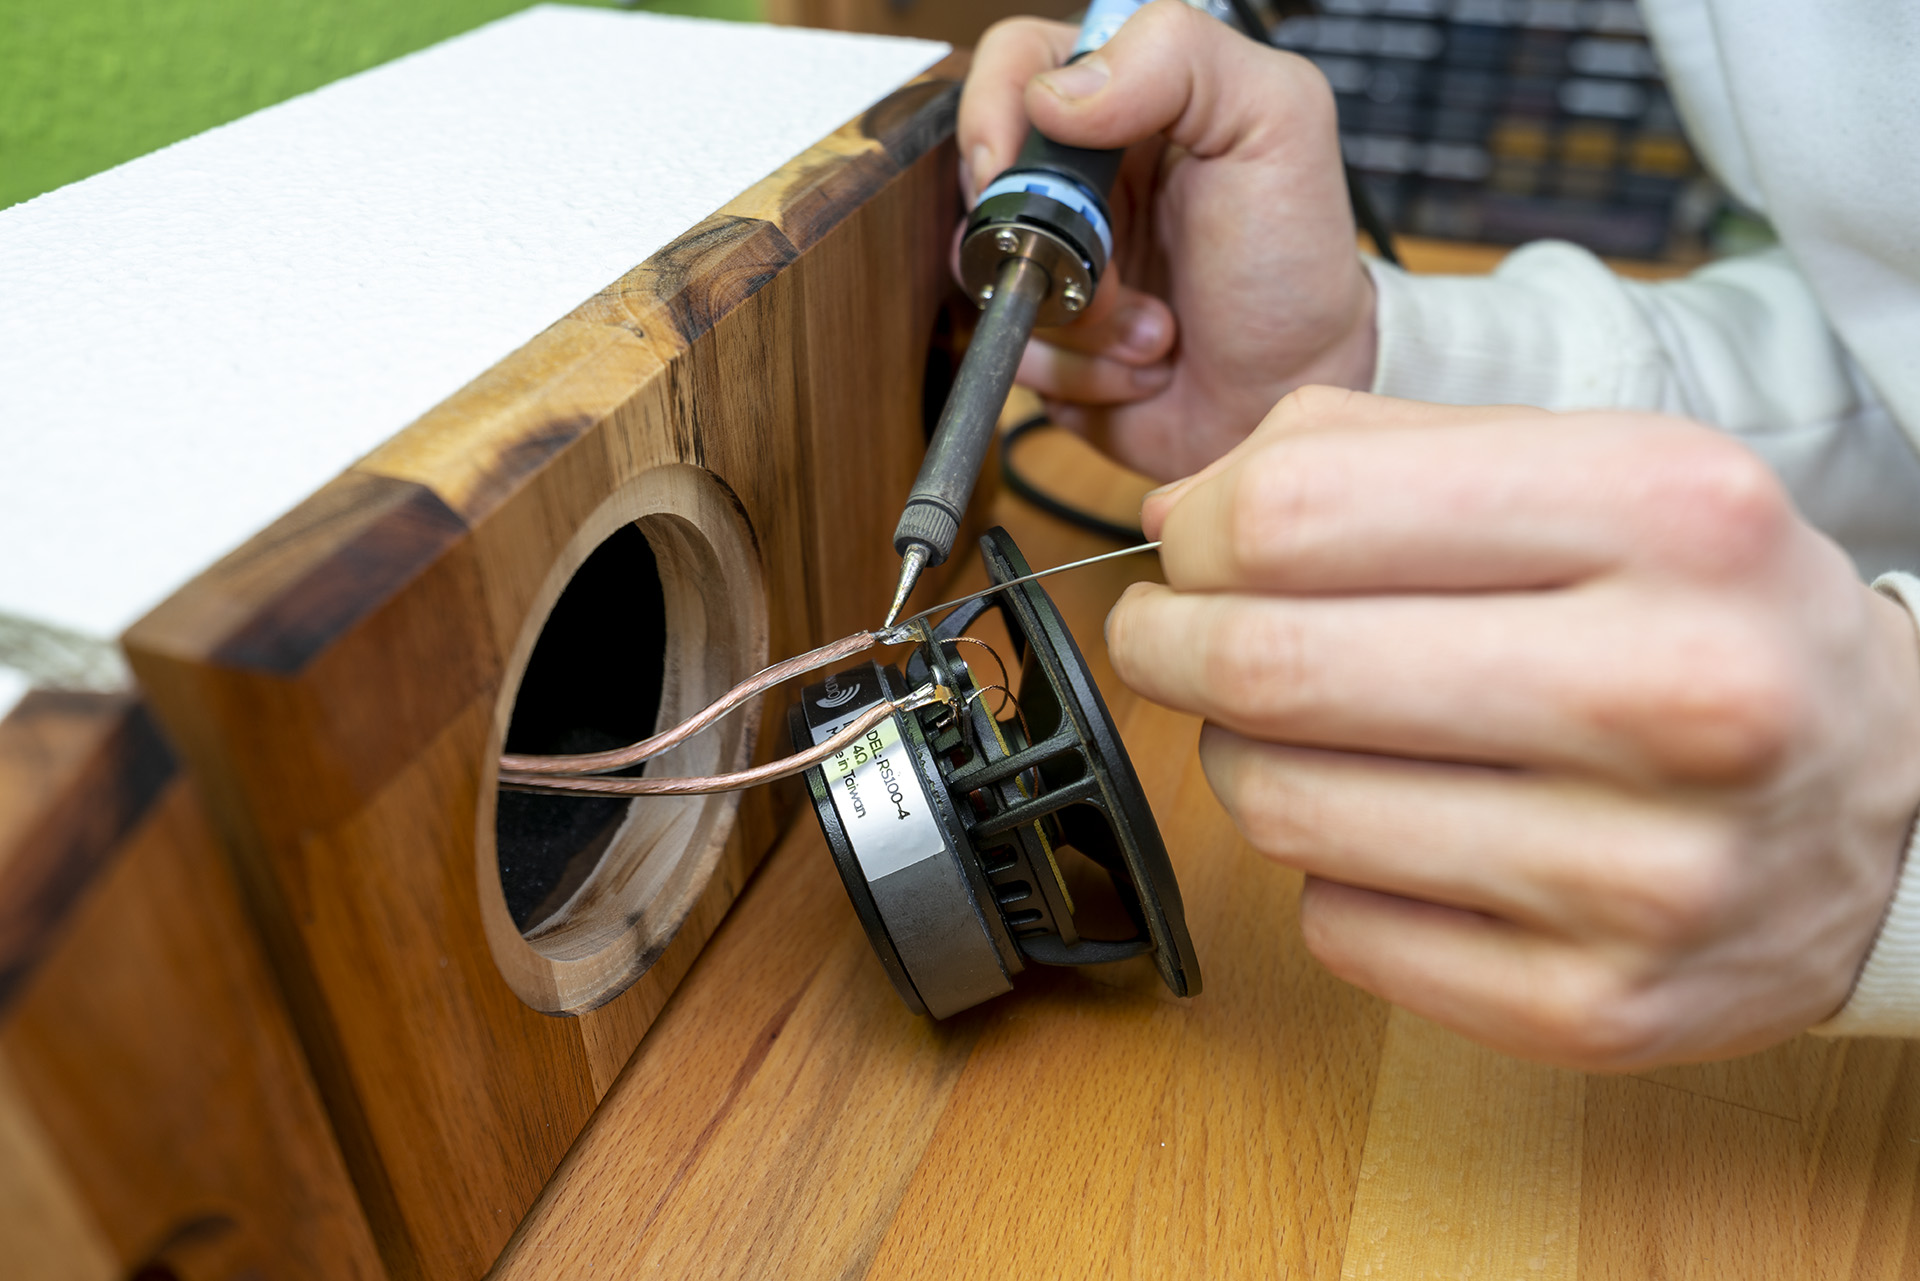

Unfortunately, I didn’t have any nice black screws on hand and didn’t want to run to the hardware store at this point, so I decided to quickly paint a few regular wood screws with some black spray paint. I am not that pleased with the result, however, and will probably be replacing these with some nicer ones in the future.
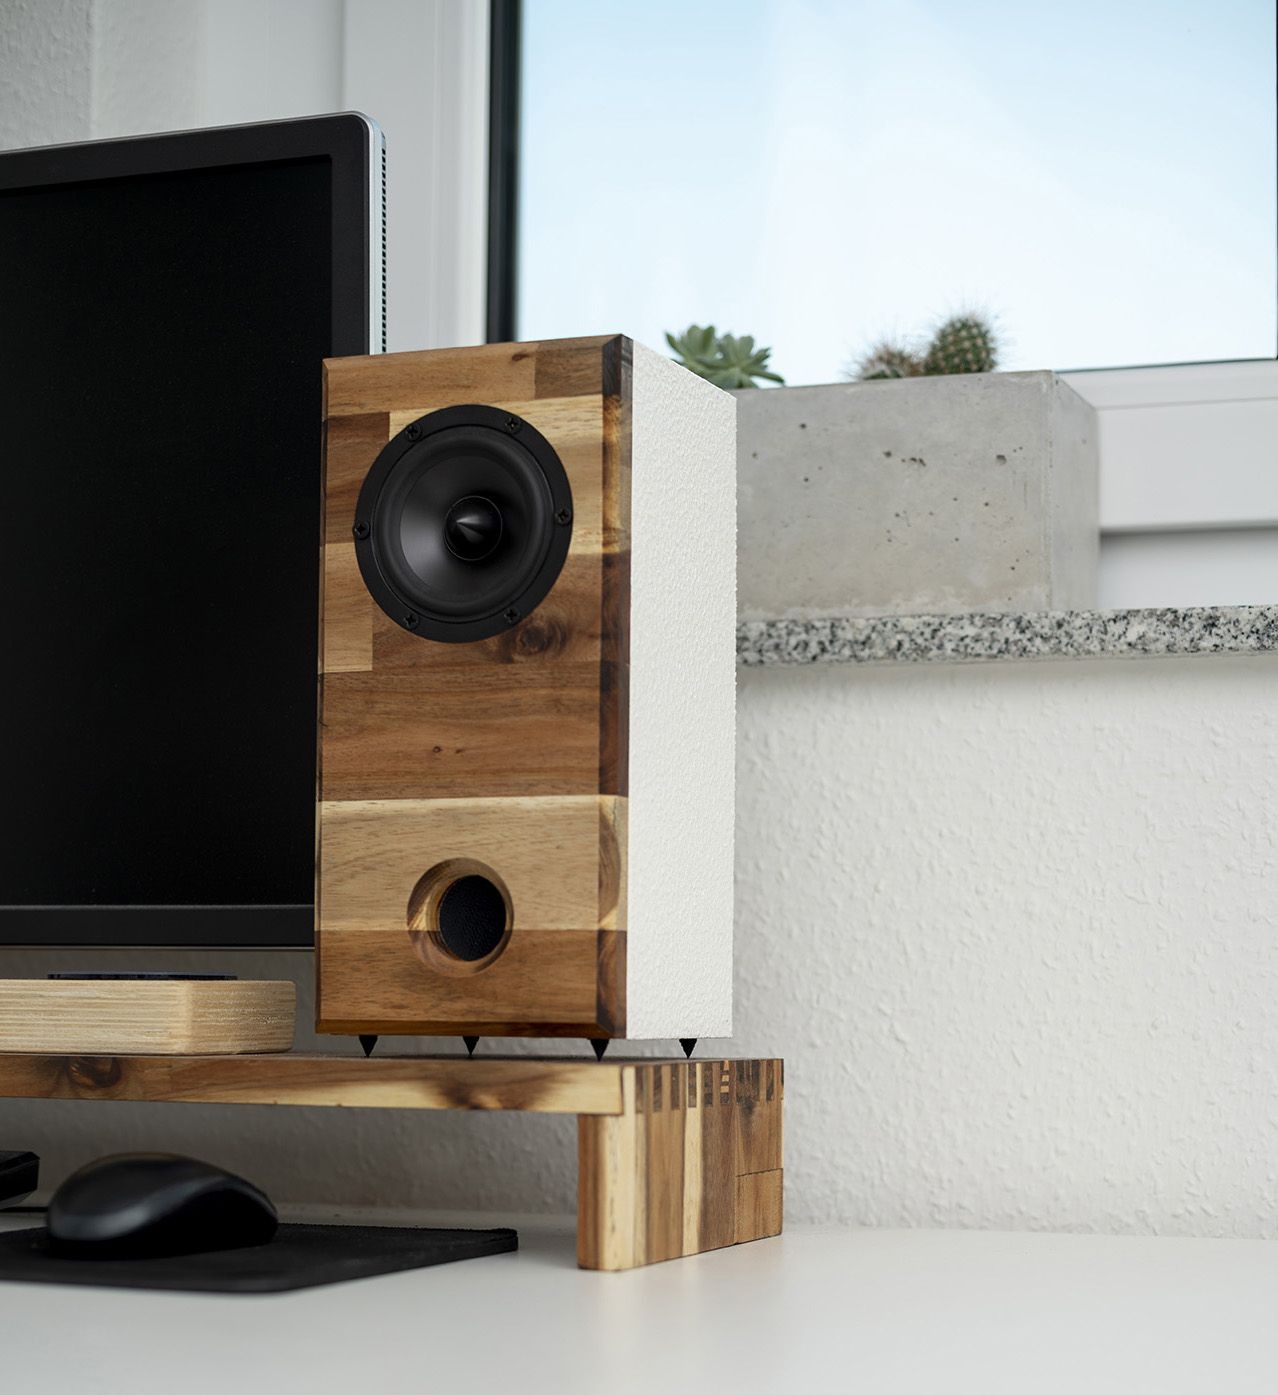
3D printing spike feet
I’m a sucker for those metal spike feet on some of the higher-end speakers but I didn’t want to just buy a set of them for a horrendously high price. Since I temporarily have a 3D printer at home for an upcoming project, I decided to make use of it for this project as well. I quickly downloaded a 3D model for some speaker spikes from Thingiverse, scaled it down to make the spikes around 10mm in height and then printed them on the 3D printer, which was only a matter of a few minutes.
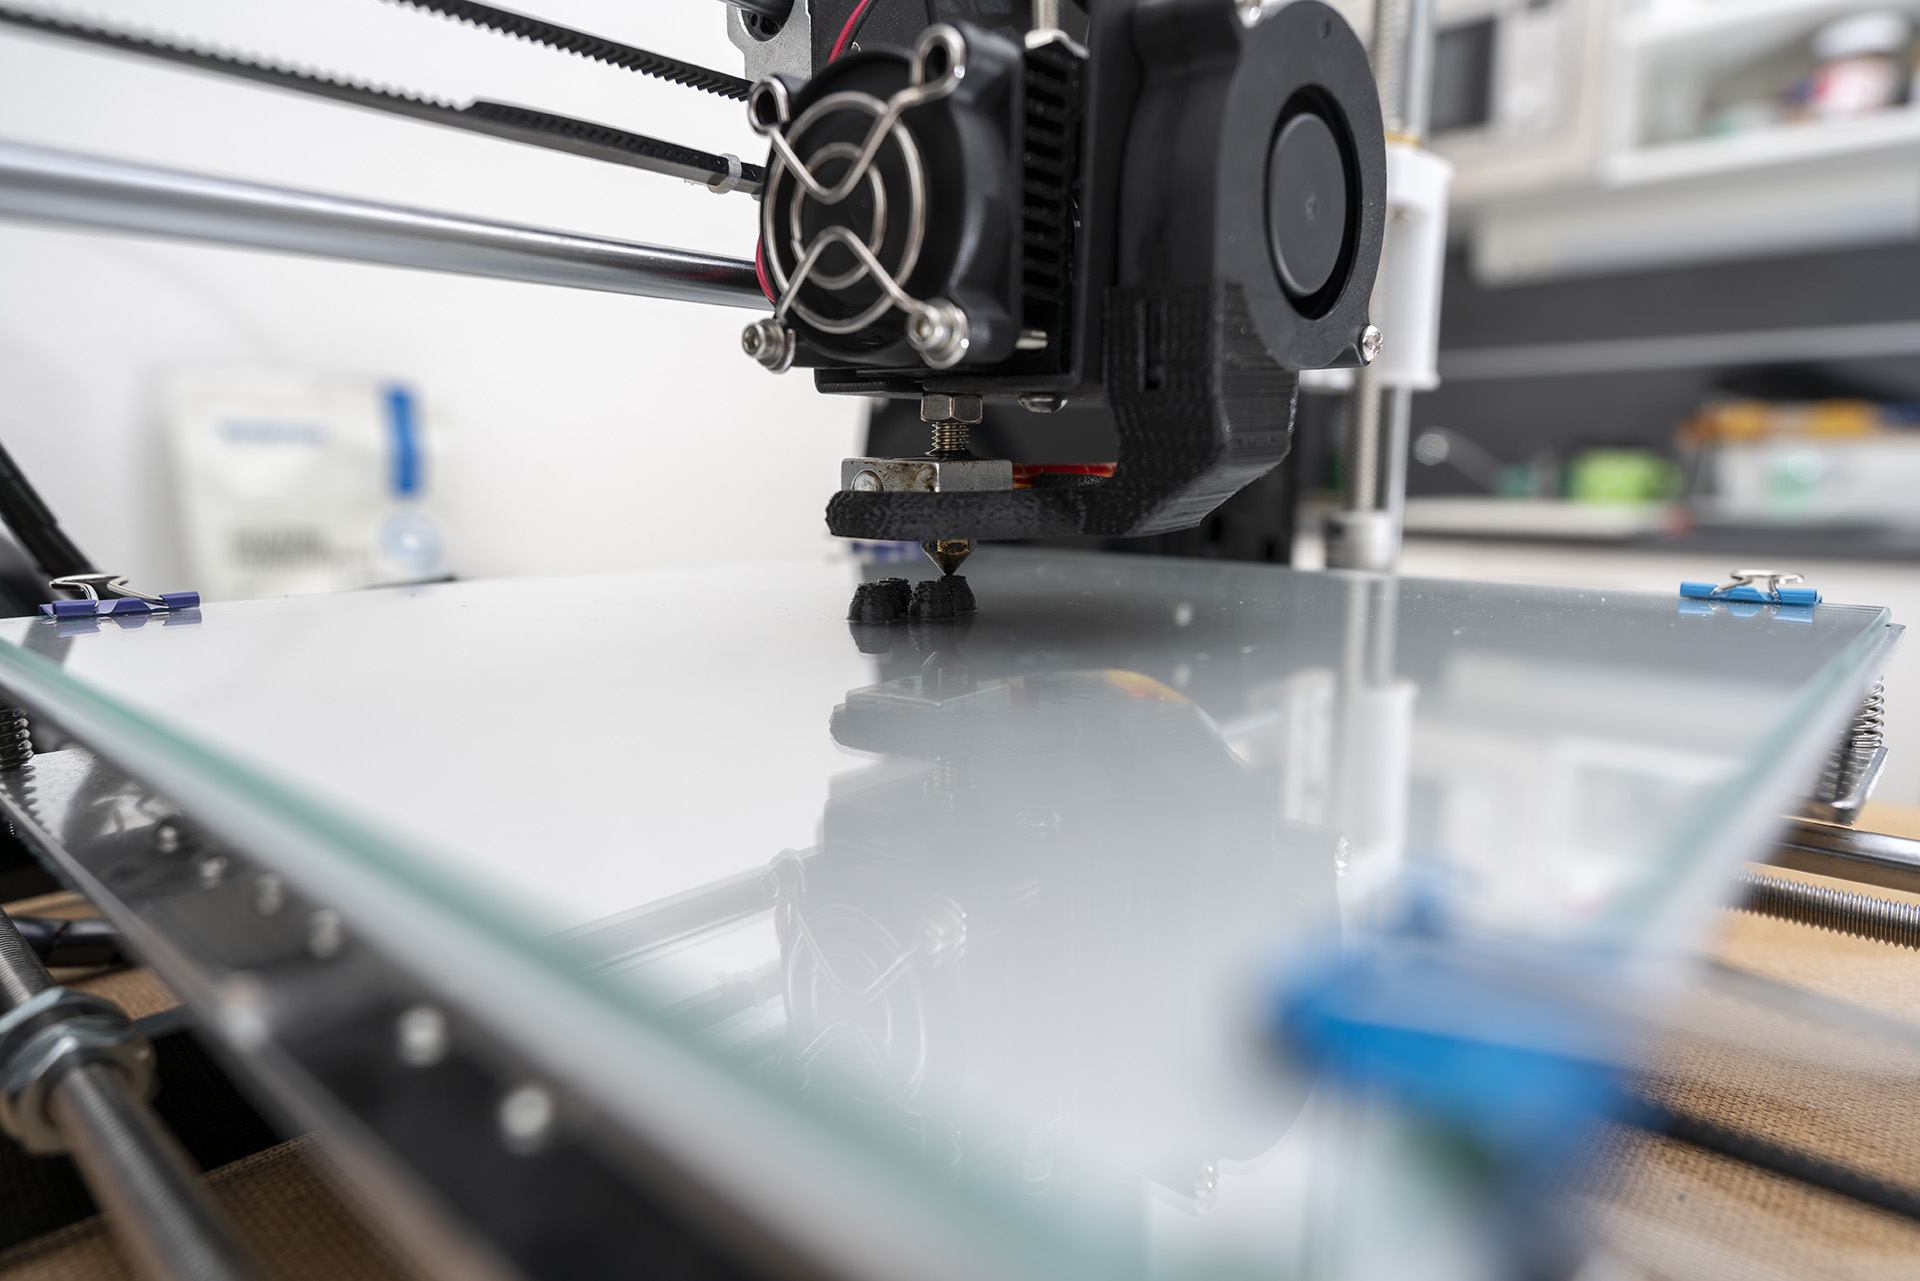

I was pleased with the result I achieved and attached the feet to the bottom of my speakers using hot glue.
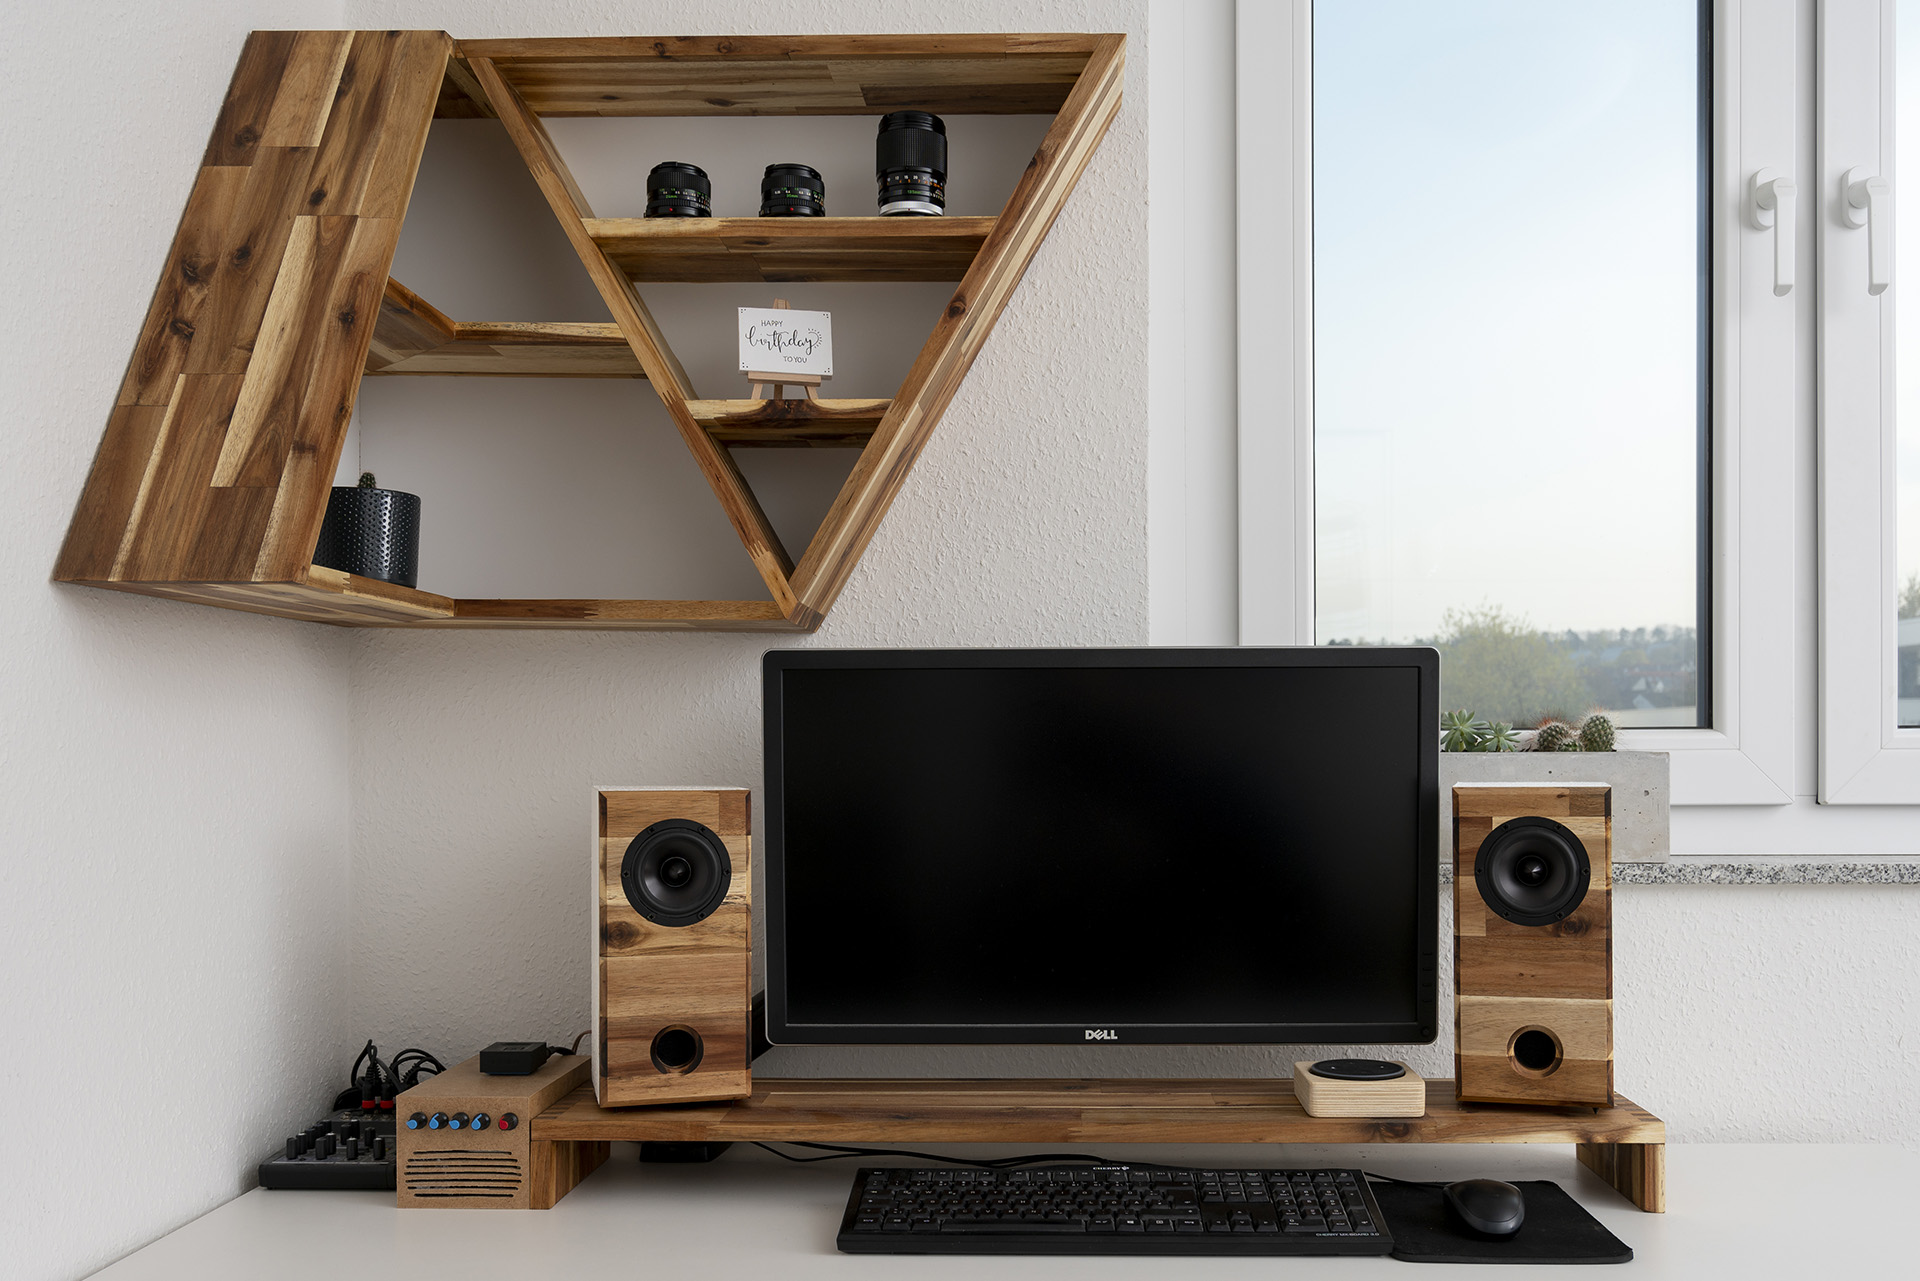
The Result
I absolutely love the outcome of this speaker build. Even though their overall shape isn’t very extravagant, the texture coating and the acacia baffles make them special. And oh man… I wish I could somehow demonstrate the way they sound. It is absolutely amazing. They sound like much more than some simple 4″ full-range drivers, the mids and highs are so clear and even in the lower frequencies, with my subwoofer fully turned off, there is quite a bit of volume there.
About me
My name is Marco and I am currently studying Electrical Engineering and Computer Science at the University of Stuttgart. To counterbalance the strong theoretical focus, I am building things made from wood, metal or concrete in my spare time and I like to document the building process on my blog. Speaker building is the ideal hobby for me, because it allows me to strive for the best possible result by combining theoretical calculations and craftsmanship. Also, I can enjoy the result every day when listening to music or watching a movie.
Would you like to see more creations of Marco? Check out his Wordpress blog.
Used components
4″ Dayton Audio RS100-4 full-range drivers
DuraTex Roller Grade 1kg Speaker Cabinet Coating Kit

Dayton Audio BPA-38G HD Binding Post Pair Gold

Tech support
Posted on friday 14 april 2023 15:26
Thank you for your reply. Although we are not the writers of this blog, I hope this explanation helps:
The sacrifice on the accuracy relates to outsourcing the milling of the panels. The specified dimensions are for 10 mm panel thickness
Show more